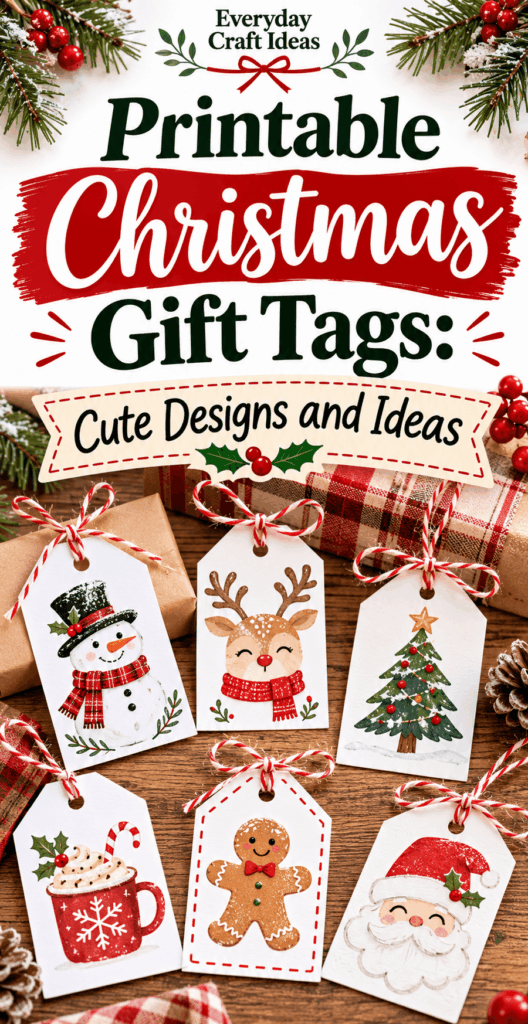
Printable Christmas Gift Tags: Cute Designs and Ideas

If you searched for christmas gift tags printable, you are probably trying to make gifts look more thoughtful without spending hours handwriting labels or buying pricey tag sets. Printable gift tags are one of my favorite “small effort, big impact” Christmas crafts because they work for every style, from classic red and green to modern neutrals, and you can make a whole stack in one sitting. You can also match them to your wrapping paper, coordinate tags for different family members, or print kid-friendly designs for classroom gifts.
This guide walks you through materials, paper choices, printing tips, cutting and punching cleanly, plus design ideas you can customize. If you are also crafting gifts, pair your tags with ideas from DIY Christmas gifts people actually want. And if you love making paper projects, browse free Christmas craft printables for more coordinated printables.
Materials and tools needed
You do not need a fancy craft room to make great printable tags, but the right supplies make the finished tags look crisp and professional. Here is what I recommend and why it matters.
- Printable tag file (PDF is best): PDFs keep sizing consistent across printers. If you use an image file, it is easier to accidentally scale it.
- Paper or cardstock: For durable tags, use cardstock in the 65 lb to 110 lb range. Lighter paper works for quick tags, but it can curl or tear at the hole.
- Printer (inkjet or laser): Inkjet gives rich color but may smear on glossy paper. Laser is crisp and fast, and it handles some heavier stocks well.
- Paper trimmer or sharp scissors: A trimmer gives straighter edges and faster batching.
- Hole punch: A standard single-hole punch works, but a 1/8 inch punch is great for thin string, and a 1/4 inch punch suits ribbon.
- String, twine, ribbon, or gift wrap ties: Choose something that matches your wrapping style and fits your hole size.
- Optional finishing supplies: Corner rounder punch, metallic pen, glitter glue, clear tape, small stickers, and double-sided tape for layering.
These same tools also show up in many Christmas paper crafts to make, so they are worth keeping in your kit.

Skill level and estimated time
This is a true beginner project with lots of room to level up. If you can print a page and cut on a line, you can make printable tags. The most “advanced” part is getting your printer settings right so the tags come out at the intended size.
Difficulty: Beginner (easy) with optional intermediate upgrades like layering, embossing, or adding ribbon details.
Estimated time:
- 10 to 15 minutes to print one or two sheets and make a small set of tags (about 8 to 16 tags, depending on layout).
- 30 to 45 minutes to batch-produce a generous stack (30 to 60 tags) with clean cuts and punched holes.
- 45 to 90 minutes if you are adding embellishments like glitter accents, extra layers, or handwritten calligraphy names.
Project size and use: Most printable tag pages are designed to print on standard letter-size paper (8.5 x 11 inches) and yield tags ranging from about 1.5 x 2.5 inches up to 3 x 4 inches. Smaller tags are great for treats and party favors, while larger ones work better on big gifts or gift bags.
Preparation and safety tips
A little prep prevents smudges, crooked cuts, and wasted cardstock. Start by setting up a clean, flat workspace and clearing away anything that could transfer ink, like glue residue or wet paint.
- Do a test print on plain paper first. This checks sizing and color without wasting cardstock. It is especially helpful when using any christmas gift tags printable file you downloaded from a new source.
- Let ink dry fully. Inkjet prints can smear if you cut immediately, especially on coated paper. Give it 5 to 10 minutes, longer if your colors are heavy or your room is humid.
- Use sharp blades. If you use a paper trimmer or craft knife, a dull blade can tear fibers and leave fuzzy edges. Replace blades when you notice snagging.
- Punch safely. Keep fingers clear of the punch opening and empty the punch tray often so paper dots do not jam the mechanism.
- Kid crafting supervision. If children are helping, pre-cut tags or use blunt-tip scissors. Hole punching is usually kid-friendly with supervision, and it is a great add-on to Christmas crafts for kids.
Finally, decide how you will attach your tags before you punch holes. Ribbon needs a larger hole than baker’s twine, and some tags look better with the hole centered while others look best at a top corner.
Project ideas and variations
One reason I love christmas gift tags printable sets is how easy it is to tailor them to your holiday style. Even if you print the same tag design, a simple change in paper, string, or embellishment can make it feel completely different. Below are three practical options depending on your goals.
Beginner friendly option
Choose a simple rectangular or round tag design with a clear “To” and “From” line. Print on white cardstock, cut along the outer border, punch one hole, and tie on with twine. If you want a cleaner look, use a corner rounder punch so the edges do not catch or bend. Keep colors simple so your printer does not over-saturate and blur small text.
Budget friendly option
Print multiple tag sheets per page using “2 pages per sheet” in your print settings, then cut them apart. Use plain printer paper and reinforce the hole by placing a small piece of clear tape over the area before punching. This creates a quick, sturdy tag without buying cardstock. Another budget saver is using yarn scraps or saved gift bag strings for tying.
Creative and personalized option
Print a base tag, then layer it onto a second piece of colored cardstock cut slightly larger to create a border. Add a tiny photo sticker, a stamped snowflake, or a name written with a metallic gel pen. For a cohesive look, match your tags to your wrapping theme. For example, kraft paper gifts look amazing with black-and-white tags and a sprig of faux greenery tucked under the string.

Printing or pattern use instructions and sizing tips
Clean printing is the difference between tags that look homemade in a charming way and tags that look rushed. Follow these steps for reliable results, especially when using a christmas gift tags printable PDF.
- Open the file in a reliable viewer. Use a PDF reader (not a web preview if it changes scaling). This helps preserve the intended dimensions.
- Set scaling to “Actual size” or 100%. Avoid “Fit to page” unless the file specifically instructs it. Fit-to-page can shrink the tags and make borders look uneven after cutting.
- Choose the right paper setting. In your printer dialog, pick “Cardstock” or “Heavyweight” if available. This slows the printer slightly and improves ink laydown.
- Print one test page first. Check that circles are true circles and that any cut lines are not clipped at the edge. If the design has a 1-inch test square, measure it with a ruler.
- Decide on final tag size before you print multiples. Common tag sizes include 2 x 3.5 inches (classic), 2.5 x 4 inches (roomy), and 1.5 x 2.5 inches (mini tags for treats). If your printer supports borderless printing, only use it if the file is designed for it, or your cut lines may disappear.
- Batch print, then batch cut. Printing all pages first and cutting second keeps your workflow efficient and your cuts consistent.
If you want smaller tags, use your printer’s “Multiple pages per sheet” option rather than manually resizing the artwork. Manual resizing can distort proportions and blur text.
Common mistakes and troubleshooting
Printable tags are simple, but a few common issues pop up every December. Here is how to fix them quickly.
- Problem: Tags print too small or too large. Solution: Reprint with scaling set to 100% or “Actual size.” Also make sure your paper size is correct (Letter vs A4) because that alone can shift margins.
- Problem: Colors look dull or muddy. Solution: Increase print quality to “Best” for the final run. If you are printing on kraft or colored cardstock, expect colors to shift. Use high-contrast designs or print on white, then mount on colored paper.
- Problem: Ink smears when cutting. Solution: Allow more drying time and avoid glossy paper on inkjet unless it is inkjet-coated photo paper. You can also lightly dust hands with a dry towel and handle prints by the edges.
- Problem: Edges look jagged or fuzzy. Solution: Use a paper trimmer with a sharp blade and cut in one firm motion. If using scissors, cut slowly and rotate the paper, not the scissors, for smoother curves.
- Problem: Hole tears out when tying. Solution: Punch the hole at least 1/4 inch from the edge. Reinforce with a small circle sticker (hole reinforcement labels work perfectly) or add clear tape before punching.
A quick quality check: before you make 40 tags, finish one completely. Print, cut, punch, tie, and write on it. That mini “prototype” catches nearly every issue.
Finishing and styling tips
The finishing touches are where a basic christmas gift tags printable becomes a truly cute, styled detail. Focus on two things: clean edges and coordinated materials.
- Upgrade the cut: Round corners, cut as a perfect rectangle, or use decorative scissors for a scalloped look. If your design is circular, cut slightly outside the line first, then trim closer for a smooth circle.
- Add dimension: Mount the tag onto a slightly larger backing in coordinating cardstock. Use double-sided tape for a flat look or foam tape for a raised effect.
- Use a consistent tying material: Baker’s twine for a classic look, velvet ribbon for a cozy vintage vibe, or thin satin ribbon for elegant gifts. Keep the knot style consistent across gifts for a boutique feel.
- Include a mini accent: A tiny jingle bell, a paper snowflake, a cinnamon stick (for decor, not food safety), or a faux pine sprig can be tucked under the string. Avoid fresh greenery if the gift will be stored for weeks or if the recipient has allergies.
- Write with intention: Use a fine-tip marker for small tags and a bold marker for dark designs. Metallic markers show up well on deep green, navy, or black backgrounds.
“I printed a set of tags on cardstock and added kraft paper backings like you suggested. They looked so polished that my sister thought I bought them from a stationery shop. The tape-over-the-hole tip saved me because my ribbon kept tearing the paper before!”
Storage and care
If you print extra christmas gift tags printable sheets each year, you will build a stash that makes next December much easier. The trick is keeping them flat, clean, and easy to find.
- Store flat to prevent curling. Place finished tags in a labeled envelope, photo storage box, or a plastic zipper pouch inside your wrapping bin.
- Separate by theme or color. Sort into groups like “kid tags,” “classic,” “neutral,” and “funny.” That way you can match wrapping styles quickly.
- Keep away from moisture and heat. Humidity can warp paper and make ink tacky. Avoid storing next to candles, oils, or anything scented that might transfer to paper.
- Protect embellishments. If you used glitter glue, dimensional stickers, or foam tape, store in a rigid container so nothing gets crushed.
If you already punched holes, thread a few tags onto a binder ring to keep them together. This is especially handy if you make “sets” for teachers, neighbors, or coworkers.
Common Questions
How do I make my printable tags look less “flat” without buying lots of supplies?
Use one simple upgrade: mount your printed tag onto a slightly larger backing cut from kraft paper, colored cardstock, or even a brown paper grocery bag. That tiny border adds dimension immediately. You can also punch the corners round or add a small sticker near the hole. Keeping your twine or ribbon consistent across gifts also makes everything look more cohesive.
My printer leaves lines or streaks on dark designs. What should I do?
First run a nozzle check or print-head cleaning (inkjet) or clean the drum area if your printer allows it (laser). Then switch the quality setting to “High” or “Best” for the final print. If streaking continues, avoid heavy full-bleed dark backgrounds and choose designs with more white space. Printing on matte cardstock can also reduce visible banding.
How can I personalize tags quickly for a lot of people?
Print a coordinated set of tags, then personalize with a consistent system: one metallic marker color for names, and one short message like “To the best neighbor” or “From the Smiths.” If you are doing teacher gifts or coworkers, consider printing a few tag styles and assigning one style per group so you can identify them at a glance during wrapping.
What is the cleanest way to cut lots of tags evenly?
A paper trimmer is your best friend for batching. Start by trimming the outer margins off the printed sheet, then cut along one direction (all vertical cuts), stack the strips, and finish with the horizontal cuts. This assembly-line approach keeps sizes consistent. For small interior cut lines, a metal ruler and craft knife can be precise, but always cut on a self-healing mat.
How do I keep holes from ripping when I use thick ribbon?
Use a larger hole punch (around 1/4 inch) and keep the hole at least 1/4 inch from the edge. Reinforce the hole area with a circle sticker, a hole reinforcement label, or a small piece of clear tape before punching. If your tag is small, consider switching to thinner ribbon or twine so the tag is not stressed when tied.
Can I make matching tags for kid gifts and still keep them looking neat?
Yes. Choose one tag layout and print it in two colorways: a playful version for kids and a simpler version for adults. Let kids help by adding one element that is contained, like placing a sticker in a designated spot or threading yarn through the hole. Keep cutting and hole punching as the adult step to maintain clean edges and consistent sizing.
Frequently Asked Questions About Printable Christmas Gift Tags: Cute Designs and Ideas
FAQ How do you print Christmas gift tags?
Download or open your christmas gift tags printable file, ideally as a PDF, and print from a PDF viewer. In the print dialog, choose the correct paper size (usually Letter 8.5 x 11 inches) and set scaling to 100% or “Actual size.” Print one test page on plain paper first, then print the final version on cardstock for sturdier tags.
FAQ What paper should I use for gift tags?
Cardstock is the best all-around choice because it holds its shape and does not tear easily at the hole. Look for 65 lb to 110 lb cardstock depending on your printer’s capacity. Matte cardstock is easiest to write on. If you are using regular printer paper, reinforce the hole area with clear tape or a small sticker before punching.
FAQ Can I print gift tags on cardstock?
Yes, and it is the most common way to get professional-looking results. Check your printer’s manual for the maximum cardstock weight and load one sheet at a time if your printer tends to jam. Select a “Heavyweight” or “Cardstock” setting if available. Let inkjet prints dry fully before cutting to avoid smudges.
FAQ How do you attach printable tags to gifts?
The simplest method is punching a hole and tying the tag on with twine, ribbon, or a gift wrap tie. For gift bags, you can loop ribbon through the handle and the tag hole. For wrapped boxes, slide the tag under the ribbon cross and tie a bow on top. If you do not want a visible knot, tape the tag to the package using double-sided tape.
FAQ What size should Christmas gift tags be?
Most tags look balanced at about 2 x 3.5 inches for standard gifts. Use 1.5 x 2.5 inches for treat bags, small favors, and ornament exchanges. Choose 2.5 x 4 inches or larger for oversized gifts or when you want room for a longer message. If you are printing smaller sizes, use your printer’s “multiple pages per sheet” option to keep everything proportional.
Final thoughts
Printable tags are a simple way to make every package feel intentional, and once you have a system, it becomes a fast yearly tradition. Pick a christmas gift tags printable design you love, do one test print, then batch your steps: print, cut, punch, and tie. Add one small finishing touch like a rounded corner or a neat twine bow, and your gifts instantly look more polished. Your next step is easy: choose your paper, print one sheet today, and make a mini set of tags you can keep in your wrapping box so you are ready when the first gift needs labeling.