Punch Needle Coasters: 10 Textured Designs to Try
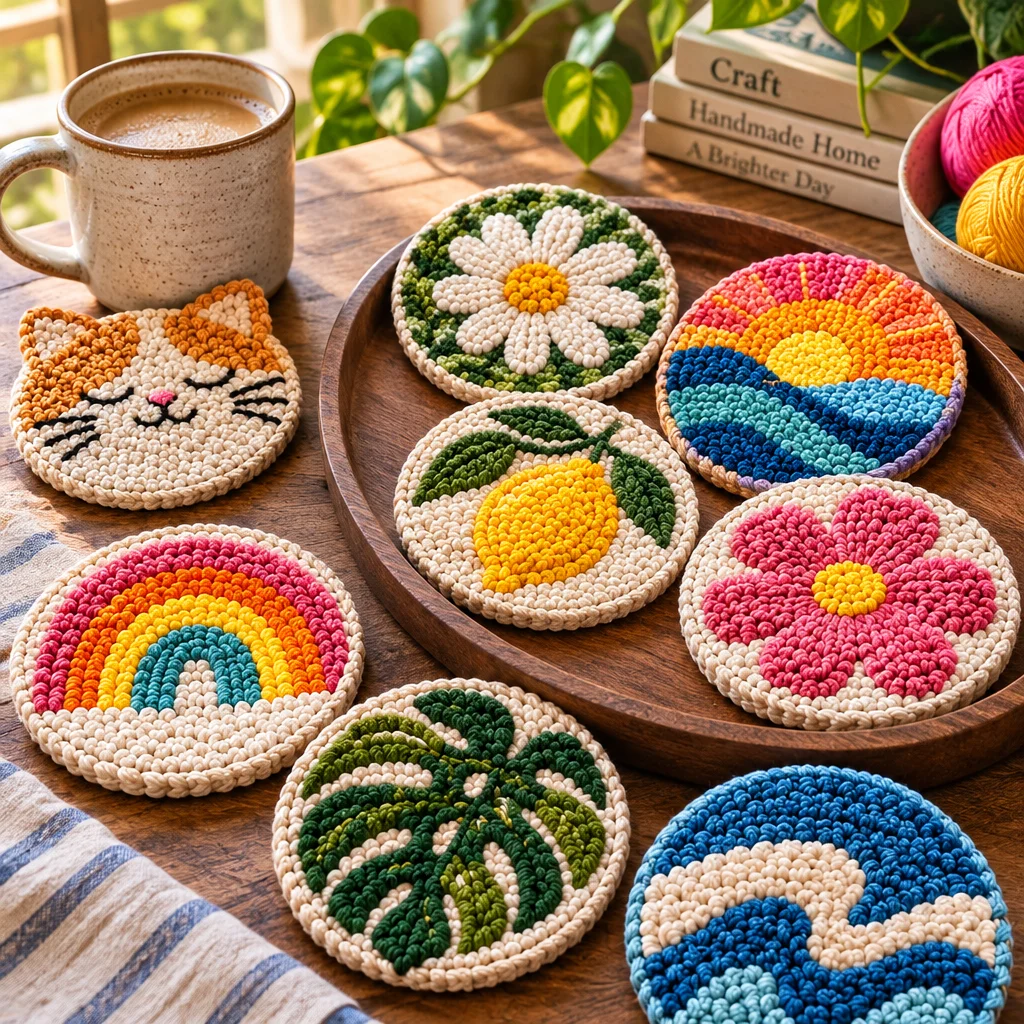
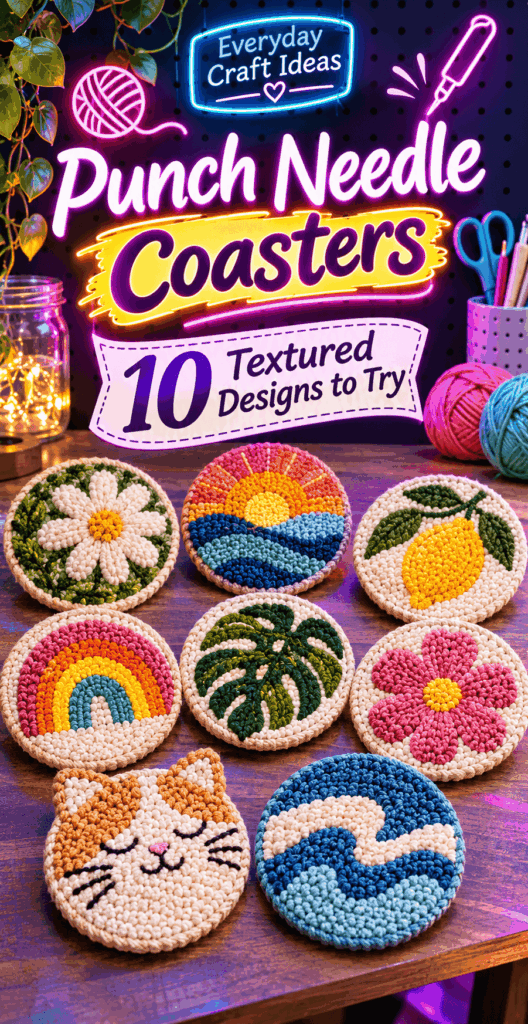
Punch Needle Coasters are one of the fastest ways to get that cozy, textured look of punch needle without committing to a big wall hanging. In a single evening, you can make a set that protects your table, adds color to your coffee corner, and teaches you the core skills you will use on larger projects: keeping even loops, clean edges, and secure backing. This project suits true beginners because the shapes are small and forgiving, but it is also satisfying for experienced crafters who want to test color palettes and textures.
If you love making functional home items, you may also enjoy exploring other coaster styles for variety, like these easy handmade polymer clay coasters for a hard, wipe-clean option. I also like mixing sets: a few soft punch needle coasters for mugs and a few DIY polymer clay coasters for condensation-heavy cold drinks. This guide walks you through materials, 10 textured designs, and finishing steps so your coasters look great and hold up to real use.
Materials for Punch Needle Coasters
Successful Punch Needle Coasters come down to three choices: a foundation cloth that grips yarn well, a yarn and needle combination that fills the space without falling out, and a finishing method that keeps everything stable on the table. You can absolutely start with a small kit, but it helps to understand why each component matters. A coaster is handled a lot, exposed to moisture, and often dragged slightly across a table. That means your materials need to be sturdy, not just pretty.
Plan your coaster size before you buy supplies. A standard round coaster is usually 4 to 4.5 inches (10 to 11.5 cm). If you prefer a larger “mug rug” style, go 5 to 6 inches (12.5 to 15 cm). For beginners, I recommend making one test coaster first to confirm your yarn sits securely in the cloth and your needle makes loops on the correct side.
Punch needle, monk’s cloth and suitable yarn
For coasters, an adjustable punch needle is ideal because you can set loop height (shorter loops generally wear better). Monk’s cloth is a classic foundation fabric because its even weave holds yarn securely. Look for monk’s cloth made for punch needle, not loosely woven “monk’s cloth” sold for other uses. If you can see large gaps easily, it may be too open.
Yarn should match your needle size. Many coaster makers use worsted weight yarn with a medium punch needle. Thicker yarn fills faster and looks plush, but it can be bulky around edges. Cotton yarn is less fuzzy and can be nice for crisp designs, while acrylic is budget-friendly and widely available. Avoid very slippery yarns at first, since they can loosen more easily when handled.
Embroidery hoop or gripper frame
A tight surface is non-negotiable. An embroidery hoop works for small Punch Needle Coasters, but you must tighten it well and re-tighten often. A gripper strip frame (sometimes called a no-slip frame) holds monk’s cloth extremely taut and is wonderful if you plan to make multiple coasters.
Whichever you use, aim for “drum tight” fabric. If your cloth has slack, your loops can become uneven, and your needle may snag threads instead of sliding between them.
Backing fabric and non-slip options
Backing keeps loops from shifting and gives your coaster a professional finish. Common options include felt circles, cork, faux leather, or a sturdy cotton. Felt is beginner-friendly because it is easy to cut and glue or stitch. Cork adds grip and helps the coaster lie flat. You can also add a thin non-slip shelf liner circle under the backing if your table surface is slippery, but keep it thin so the coaster does not wobble.
Adhesives matter: use a flexible fabric glue or tacky glue that dries flexible. If you use hot glue, apply carefully and sparingly, because thick ridges can create bumps that affect cup stability.
10 Punch Needle Coaster Patterns
The designs below are intentionally simple, bold, and suited to small surfaces. Each one works as a single coaster or as part of a coordinated set. When choosing colors, pick high contrast if you want the pattern to read clearly from across the room, or choose tone-on-tone neutrals for a calm, textured look. For all patterns, remember that the looped “front” is formed on the opposite side from where you punch, so keep your design visible on the punching side (the “back”) and check the looped side occasionally.
If you are building a gift set, consider pairing two or three patterns in the same color family. You can also mix punch needle with other DIY coaster types for different uses, like adding a couple of polymer clay coaster ideas for outdoor drinks or messier situations.
Checkerboard coaster
Draw a simple grid of squares (try 6 by 6) inside a circle. Punch alternating squares in two colors. Keep your loops short and dense so the edges between squares look crisp. Tip: outline each square first, then fill it in.
Simple daisy coaster
Create a small center circle and 8 to 10 oval petals around it. Use a sunny yellow center and white petals, or swap in trendy colors like terracotta and cream. A background in a soft green or natural yarn makes the flower pop.
Smiley-face coaster
Punch a solid background, then add a simple face: two small oval eyes and a curved smile. For clean features, punch the facial shapes first, then fill the surrounding background color so you can tuck edges neatly against the face.
Retro flower coaster
Think 70s vibes: a rounded flower with chunky petals and a contrasting center. Use three colors: center, petals, and background. Slightly taller loops in the flower can add fun dimension, but keep the background shorter for stability.
Abstract color-block coaster
Divide the circle into 3 to 5 irregular shapes. Pick a palette of 3 colors and one neutral. This is perfect for using scraps. To keep blocks sharp, punch along the dividing line carefully and do not overwork the cloth.
Sunburst coaster
Draw a small center circle and radiating triangles. Alternate two shades for a “ray” effect, or use a gradient from dark to light. This design looks great with slightly longer loops in the rays for texture, but keep the center compact and firm.
Mini rainbow coaster
Sketch 4 to 6 arches. Punch each band a different color, then add a background. If you want a classic look, add tiny cloud bumps at the ends. Keep arches evenly spaced by lightly marking guidelines first.
Fruit-slice coaster
Make a citrus slice: a thick outer rind, a lighter inner rind, and wedge segments. Lemon, lime, grapefruit, or orange all work. The segment lines look clean if you punch them as thin outlines before filling wedges.
Wavy stripe coaster
Draw 4 to 7 wavy horizontal stripes. Choose two colors plus a background, or make each stripe different for a playful look. Wavy designs hide minor loop inconsistencies, making them great for beginners.
Minimal monogram coaster
Punch a solid background and add a single letter in a contrasting color. Use a simple block font for best results at small scale. If letters feel tricky, stitch the monogram on the backing felt instead and keep the punch needle front minimalist.
Punching and Finishing a Flat Coaster
This is the “make it last” section. Pretty loops are only half of great Punch Needle Coasters. The other half is tension control, tidy edges, and a backing that prevents stretching. Expect your first coaster to take 60 to 90 minutes including finishing. After a few, many crafters can complete one in about 30 to 45 minutes depending on complexity.
- Cut your foundation cloth with extra margin. Cut at least 2 to 3 inches (5 to 7.5 cm) larger than your hoop or frame opening. Extra fabric makes it easier to keep tension and gives you room for finishing without crowding your design.
- Mount the cloth drum tight. Tighten the hoop screw firmly, then “walk” your fingers around the cloth edge, pulling gently until it sounds taut when tapped. Re-tighten as needed during punching.
- Thread the needle correctly. Use the needle’s threader or a wire loop. Yarn should feed smoothly without snagging. If it drags, you may have the wrong yarn thickness or a rough needle eye.
- Punch with the needle tip down and the shaft touching the fabric. Push the needle all the way down to the handle, then lift just enough to move to the next hole. Keeping contact with the fabric prevents long, uneven loops.
- Fill areas methodically. Outline shapes first, then fill them in rows. Avoid big jumps across the design, which can create uneven density and visible gaps.
- Seal the back before cutting. Apply a thin, even layer of flexible fabric glue to the punched side (the yarn tail side), keeping glue out of the loops. This step stabilizes the stitches so handling and trimming do not loosen them.
Transfer a simple design onto foundation cloth
Use a washable fabric marker or a soft pencil. For circles, trace around a cup or coaster blank. If your cloth is dark, try chalk transfer paper. Keep lines light so they do not show through gaps. Remember: you punch from the marked side and the loops appear on the opposite side.
Keep loops consistent and secure yarn tails
Consistency comes from two habits: keeping the cloth tight and punching to the same depth every time. For yarn tails, leave a 2 to 3 inch tail at the start and end, then thread it under nearby stitches on the back after gluing (or weave it under on the looped side if needed). Do not tie bulky knots that can create bumps.
Trim, back and edge the coaster neatly
After the glue dries fully, remove from the frame. Trim the foundation cloth to a neat circle leaving about 1/2 inch margin. Cut small relief slits around the edge (not into the stitching) so it folds smoothly. Glue the margin down, then attach felt or cork backing. For a clean edge, you can whip stitch around the perimeter with strong thread, or add a thin cord edge glued carefully in place.
Make Your Coasters Practical
Punch Needle Coasters should not just look cute. They should sit flat, keep cups steady, and handle minor spills. The biggest practical issue is thickness. Very tall loops feel plush but can make mugs wobble. A flatter, denser surface tends to perform better for everyday use. If you love a high-pile look, reserve those for lightweight cups and use shorter loops for heavy mugs or glassware.
Choose suitable thickness and cup stability
A good rule is to keep loop height relatively short and density high. If your needle is adjustable, start with a shorter setting and do a small test patch. Press a cup down and see if it rocks. If it does, trim the loops lightly with sharp scissors to level the surface. Trimming is optional, but it can make a coaster feel more “finished” and stable. Always trim in small passes and avoid cutting into the foundation fabric.
Protect against spills and explain gentle cleaning
Punch needle is absorbent, which is helpful for condensation but also means spills need quick attention. Blot, do not rub, with a clean cloth. For deeper cleaning, spot clean with a small amount of mild soap and cool water, then press between towels to remove moisture and air dry flat. Avoid soaking for long periods, especially if you used glue. If you want a wipe-clean option for messy drinks nights, it can be smart to keep a few hard coasters on hand too, such as polymer clay coasters made for easy cleanup.
“I tried the wavy stripe design as my first punch needle project and it turned out way better than I expected. Keeping the fabric drum tight was the biggest help. Adding cork backing made the coasters feel store-bought, and my mugs do not slide at all.”
Frequently Asked Questions About Punch Needle Coasters: 10 Textured Designs to Try
What fabric should I use for punch needle coasters?
Monk’s cloth made specifically for punch needle is the most beginner-friendly choice because the weave holds loops securely. You can also use linen or a punch needle foundation fabric labeled for your needle size, but avoid anything stretchy or loosely woven. A quick test: punch a small area, rub it lightly with your finger, and see if loops lift out. If they do, switch to a tighter weave or a thicker yarn that fills the holes better.
Do punch needle coasters need backing?
Yes, backing is strongly recommended. Coasters are handled constantly, and the edges see friction against tables. A felt, cork, or faux leather backing protects the stitches, adds weight, and helps the coaster lie flat. Backing also covers the glued side, which improves durability and appearance. If you skip backing, you may see stretching, curling edges, and loops loosening over time, especially with frequent use and moisture.
Are punch needle coasters washable?
They are best treated as spot-clean items. If you used fabric glue to seal the back, prolonged soaking can soften some glues and may lead to warping. Blot spills quickly, spot clean with mild soap, and air dry flat. If you want maximum washability, choose a washable yarn (like cotton), use minimal glue, and consider stitching the backing on rather than fully gluing it. Even then, gentle care will extend the life of your coasters.
Why are my loops pulling out when I flip the coaster over?
This usually happens when the cloth is not tight enough, the needle is not going fully down to the correct depth, or the yarn is too thin for the fabric weave. Tighten your hoop or switch to a gripper frame, then focus on a consistent “push down fully, lift slightly, move” rhythm. Also check yarn and needle compatibility. A thicker yarn often grips better, especially for beginner-friendly Punch Needle Coasters.
How do I keep circles and edges looking smooth instead of bumpy?
Outline the circle carefully first, using smaller, closely spaced punches along curves. Then fill inward in rows so you are not constantly changing direction. For the outermost edge, keep loops short and dense because tall loops exaggerate any unevenness. When finishing, cut evenly spaced relief slits in the seam allowance so the folded edge does not pucker under the backing.
Can I use embroidery floss instead of yarn?
Embroidery floss can work only if you have a punch needle designed for very fine thread and a tightly woven foundation fabric that matches it. Standard punch needles and monk’s cloth are usually sized for yarn, so floss will often slip right out. If you want delicate detail on Punch Needle Coasters, consider using thin yarn or tightly spun cotton instead of floss, or add small details with surface embroidery after punching.
What is the best way to make a set that matches but is not identical?
Pick one color palette and repeat it across different patterns. For example, make a checkerboard, a daisy, a sunburst, and a wavy stripe all using the same two main colors plus one neutral background. This gives variety while still looking coordinated. Another approach is to repeat one “signature” element, like a consistent border color or the same backing material across all coasters.
How do I stop my coaster from sliding on a smooth table?
Cork backing is the easiest solution because it adds natural grip and weight. Felt can slide on glossy surfaces, so if you prefer felt, add a thin non-slip layer between the felt and the table side, or use a grippy felt. Keep adhesive layers thin and even so the coaster stays flat. A stable coaster is safer too, especially with hot drinks.
Do I need to seal the loops on the front?
No, you generally do not seal the looped side. Sealing the back (the punched side) is what locks stitches in place. Sealing the front can make the texture stiff and may attract dust. If you plan heavy use, focus on dense stitching, strong backing, and neat edges. For households with lots of spills, it can also be practical to keep a couple of wipe-clean options, like these DIY polymer clay coasters, alongside your softer punch needle set.
Final Thoughts
Punch Needle Coasters are a practical first project because they teach the essentials quickly: tight fabric tension, consistent loop height, clean color changes, and durable finishing. If you are brand new, start with the wavy stripe or abstract color-block design since they are forgiving and still look polished. Once you have one coaster you love, make three more using the same backing and edge finish for a cohesive set.
Your next step is simple: choose one pattern, pick two to four colors, and punch a small test swatch to confirm your yarn and cloth hold loops securely. After that, batch your process: punch all fronts first, then glue and back them together. You will build skill fast, and you will end up with coasters you will actually use every day.