DIY Polymer Clay Magnets: Easy Handmade Designs
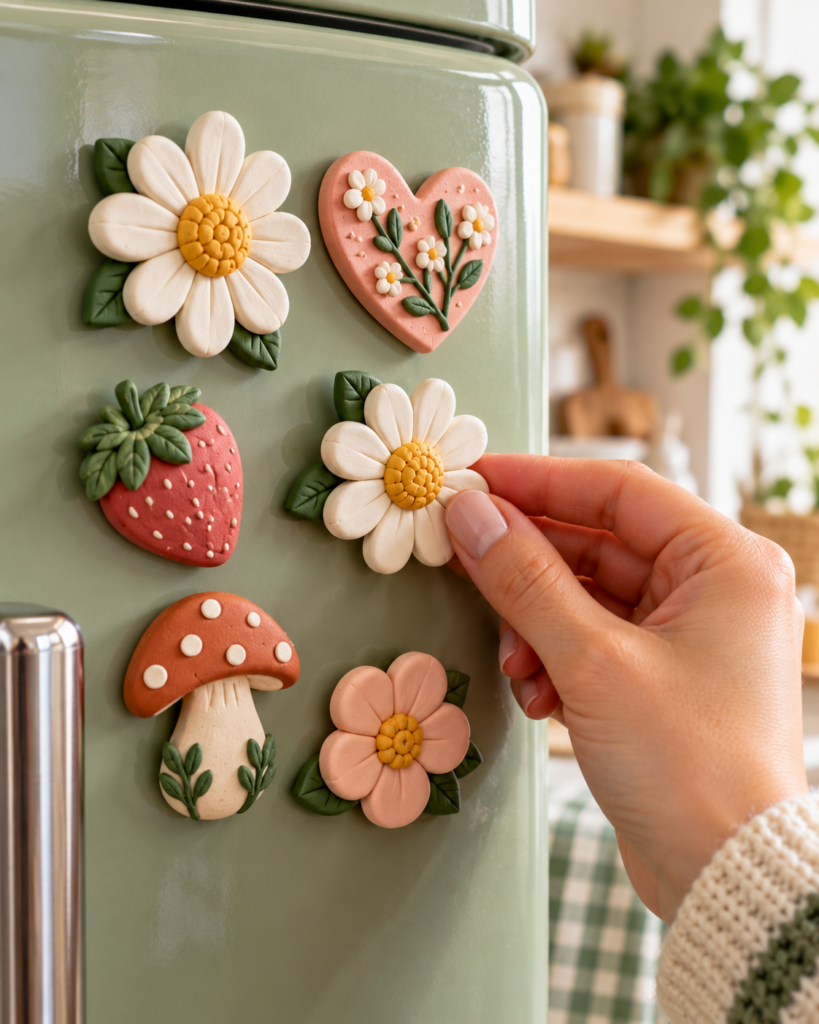
Polymer clay magnets are one of the fastest ways to turn a small amount of clay into something genuinely useful and giftable. In an afternoon, you can make a set of cheerful fridge magnets that hold shopping lists, kids’ art, and reminders without looking store-bought. The best part is that the techniques are beginner-friendly: simple shapes, easy textures, and a few smart finishing steps make a big difference.
If you enjoy quick craft sessions, you can pair these magnets with other low-prep projects like printable crafts for kids for a rainy-day activity, or make seasonal sets using free Christmas craft printables as inspiration for holiday themes. By the end of this tutorial, you’ll know how to choose magnets, bake safely, attach hardware correctly, and seal for long-lasting shine.
What You Need to Know Before Starting
Polymer clay is a PVC-based modeling clay that hardens when baked at a low temperature. It is different from air-dry clay, which dries by evaporation and can be more fragile in thin pieces. For polymer clay magnets, durability comes from three things: correct baking, enough clay thickness, and a strong bond between the magnet and the clay.
Difficulty level is beginner to confident beginner. Expect about 20 to 40 minutes of hands-on time plus 20 to 40 minutes of baking and cooling, depending on thickness and brand. Most magnet designs work best at about 1/8 to 1/4 inch thick. Thinner can warp; thicker feels bulky on the fridge.
Before you start, set up a clean work surface and keep food prep areas separate. Polymer clay is safe to use when handled properly, but you should not use the same tools for food afterward. Work with clean hands to avoid lint and dust, and keep pets away from tiny magnets.
A key decision is whether you want the magnet flush (embedded) or attached on the back after baking. Embedding looks professional but requires planning. Attaching afterward is simpler and works great with the right glue.
Supplies, Tools, and Material Choices
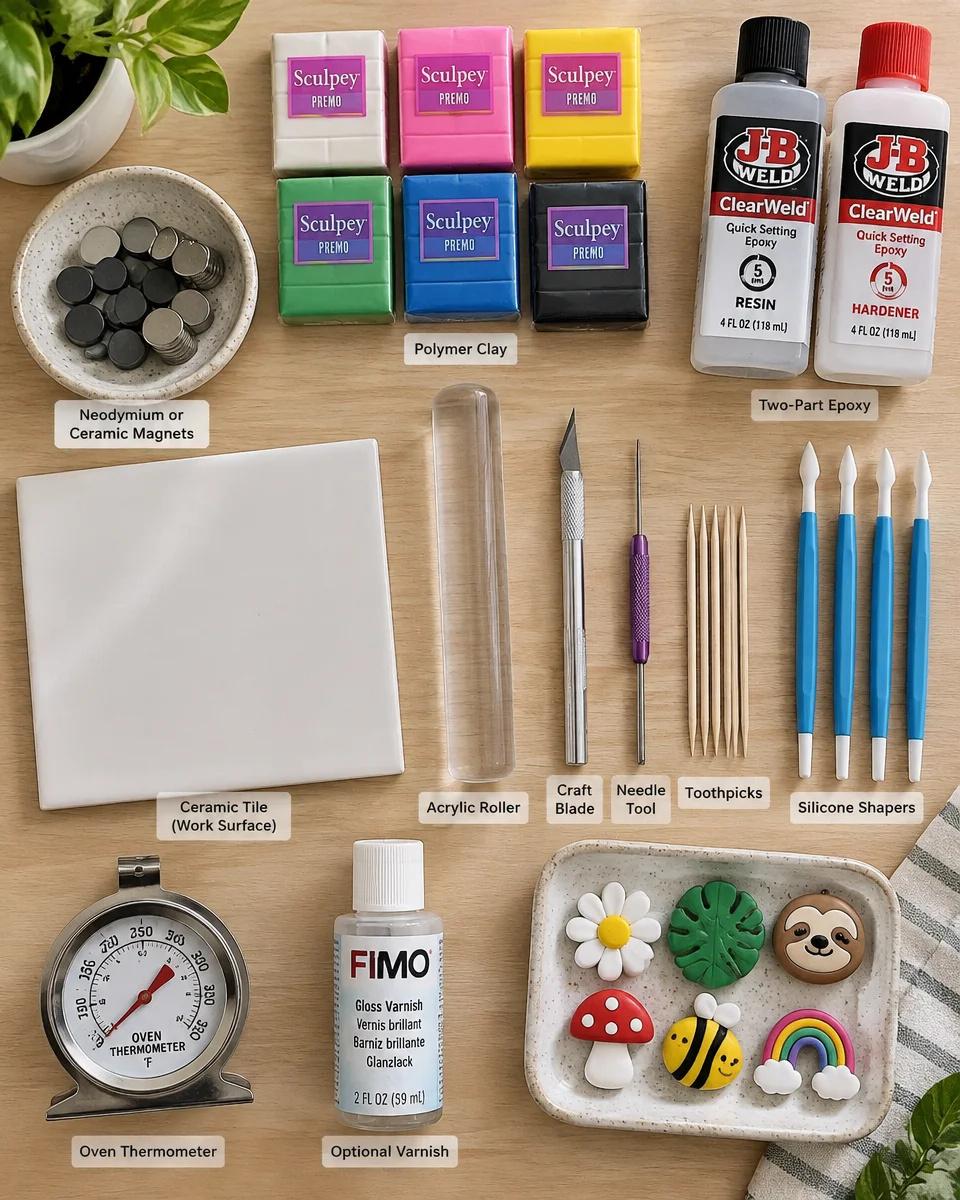
You do not need a lot of equipment for polymer clay magnets, but a few specific items will make your results cleaner and stronger. Here is a practical, beginner-friendly supply list with notes on why each item matters:
- Polymer clay: Any reputable brand works. Softer lines are easier to condition; firmer lines hold crisp details. Choose 2 to 4 colors for a cohesive set.
- Magnets: Neodymium disc magnets are strong for their size. Ceramic magnets work too but often need to be larger to hold paper well.
- Adhesive: Two-part epoxy is the most reliable for bonding magnets to baked clay. Thick gel cyanoacrylate (super glue gel) can work for lightweight magnets. Avoid school glue and hot glue for long-term strength.
- Work surface: Ceramic tile, glass, or a smooth acrylic mat. A tile can go straight into the oven.
- Roller: Acrylic roller or brayer for even thickness.
- Blade and shaping tools: Craft blade, needle tool, toothpicks, and silicone shapers for clean edges and details.
- Oven thermometer: Polymer clay is picky about temperature. A thermometer helps prevent scorching or underbaking.
- Optional sealant: Water-based polyurethane or a polymer-clay-safe varnish for extra shine and easier cleaning.
Tip for families: if you’re crafting with kids, you can simplify designs and add themed elements inspired by easy printable kids’ crafts, then translate those motifs into simple clay shapes.
How to Make or Use It (Clear Beginner-Friendly)
This method is designed for strong, everyday polymer clay magnets that won’t pop off the fridge or snap when dropped. You can scale the steps up for a whole matching set.
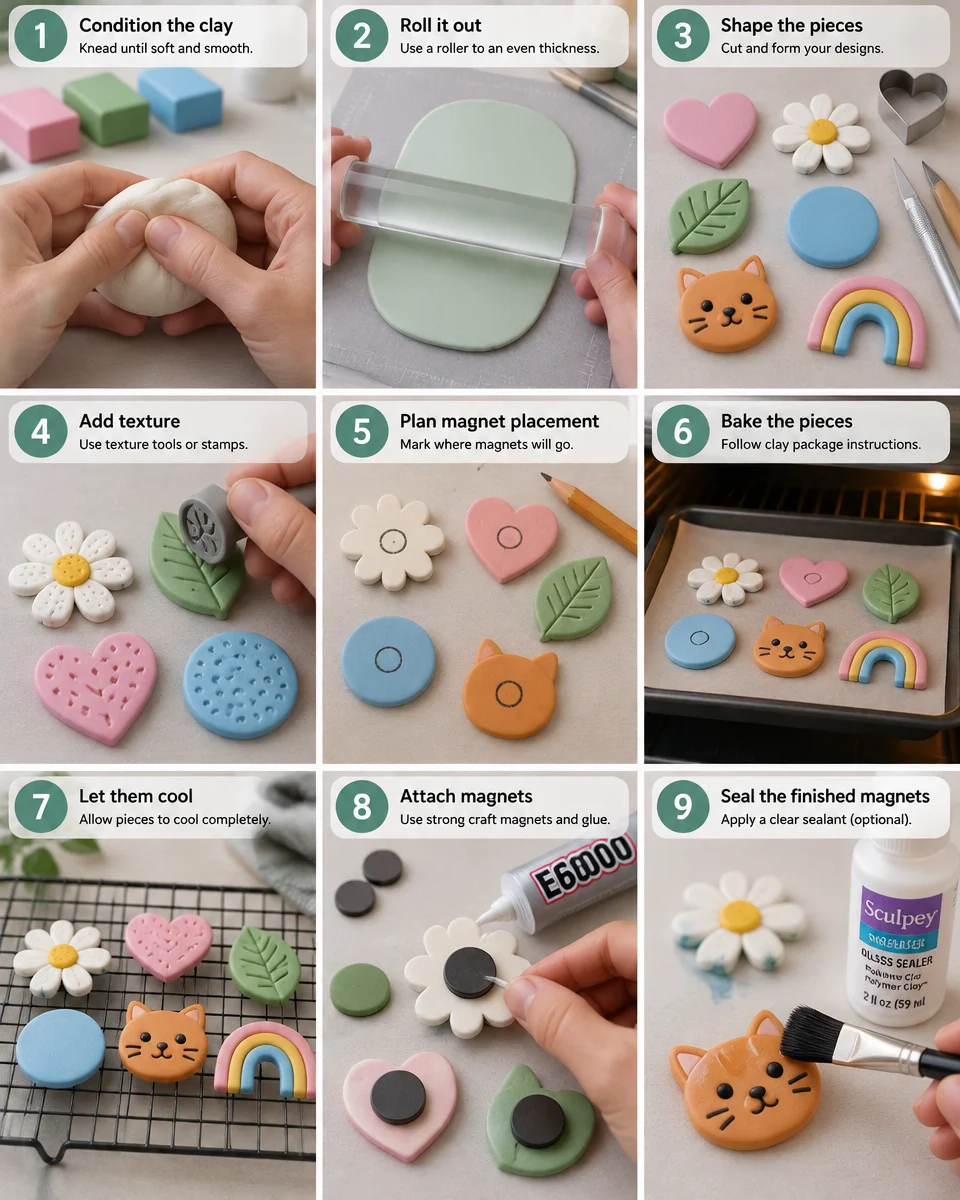
- Condition the clay well. Knead and roll each color until it is smooth and flexible. Proper conditioning reduces cracks after baking and helps pieces bond cleanly.
- Roll to an even thickness. Aim for about 1/8 to 1/4 inch. If you have thickness guides, use them. Even thickness prevents warping and ensures consistent bake.
- Create your shapes. Use cutters (circles, hearts, stars) or freehand with a blade. Smooth edges with a fingertip or silicone tool. For a set, keep sizes consistent so they look intentional.
- Add texture and details. Press in patterns with a stamp, toothpick, or textured fabric. Keep details shallow so they do not trap air pockets. If layering pieces, press gently so seams fully contact.
- Plan the magnet placement. Mark the back where the magnet will sit. Keep it centered for balance. For larger designs, two small magnets work better than one.
- Bake the clay. Place pieces on parchment on a tile or baking sheet. Bake according to your clay brand’s instructions (commonly around 265 to 275 F). Use an oven thermometer. Bake long enough for strength. Underbaked clay is brittle.
- Cool completely. Let pieces cool on the tile before handling. Warm clay can feel flexible and may dent if pressed.
- Attach magnets after baking. Lightly sand the magnet area on the clay back with fine sandpaper for better grip, then wipe dust away. Mix epoxy and glue the magnet on. Hold in place and let cure fully.
- Optional: seal or glaze. If you want shine or easier wipe-down, apply a thin, even coat of a polymer-clay-safe finish to the front only, and let it cure.
Once finished, use your polymer clay magnets on fridges, filing cabinets, and metal doors. If you want more inspiration from another maker, this tutorial is a helpful companion: DIY Magnets with Polymer Clay – 1905 Farmhouse.
Helpful Tips for Better Results
Small refinements make polymer clay magnets look polished instead of homemade in a rushed way. Start with clean clay. Wash your hands, wipe your surface, and avoid fuzzy sleeves that shed lint. If lint lands on light-colored clay, lift it out with the tip of a needle tool instead of smearing it.
For crisp edges, cut shapes, then wait one minute before lifting them. Slightly warmed clay can distort less if you slide a blade underneath rather than pinching. To keep sets consistent, roll a single slab and cut multiple shapes at once. This helps your magnets line up neatly on the fridge.
Think about function. A magnet that is too small or too weak will slide down. If you want to hold thicker items like a postcard, use stronger neodymium magnets and a slightly larger clay base for leverage. For very large clay pieces, use two magnets spaced apart.
Color design tip: pick a limited palette. A simple trio like cream, terracotta, and sage can look modern. Seasonal palettes are fun too. If you’re already crafting for the home, you might also enjoy making matching kitchen gear like this easy apron sewing pattern for a coordinated handmade look.
Reader testimonial: “I tried these polymer clay magnets with my daughter using simple fruit shapes. The baking and cooling notes helped a lot. Our first batch was a little thick, but the second batch turned out smooth and strong, and the epoxy attachment has held for months on our fridge.”
Creative Variations and Project Ideas
Once you understand the basic process, you can make polymer clay magnets in almost any style, from playful to minimalist. Here are ideas that work well for beginners and still look impressive:
- Mini food magnets: Donuts, citrus slices, sushi, or tiny pies. Use simple canes (rolled logs) and slice for repeatable pieces.
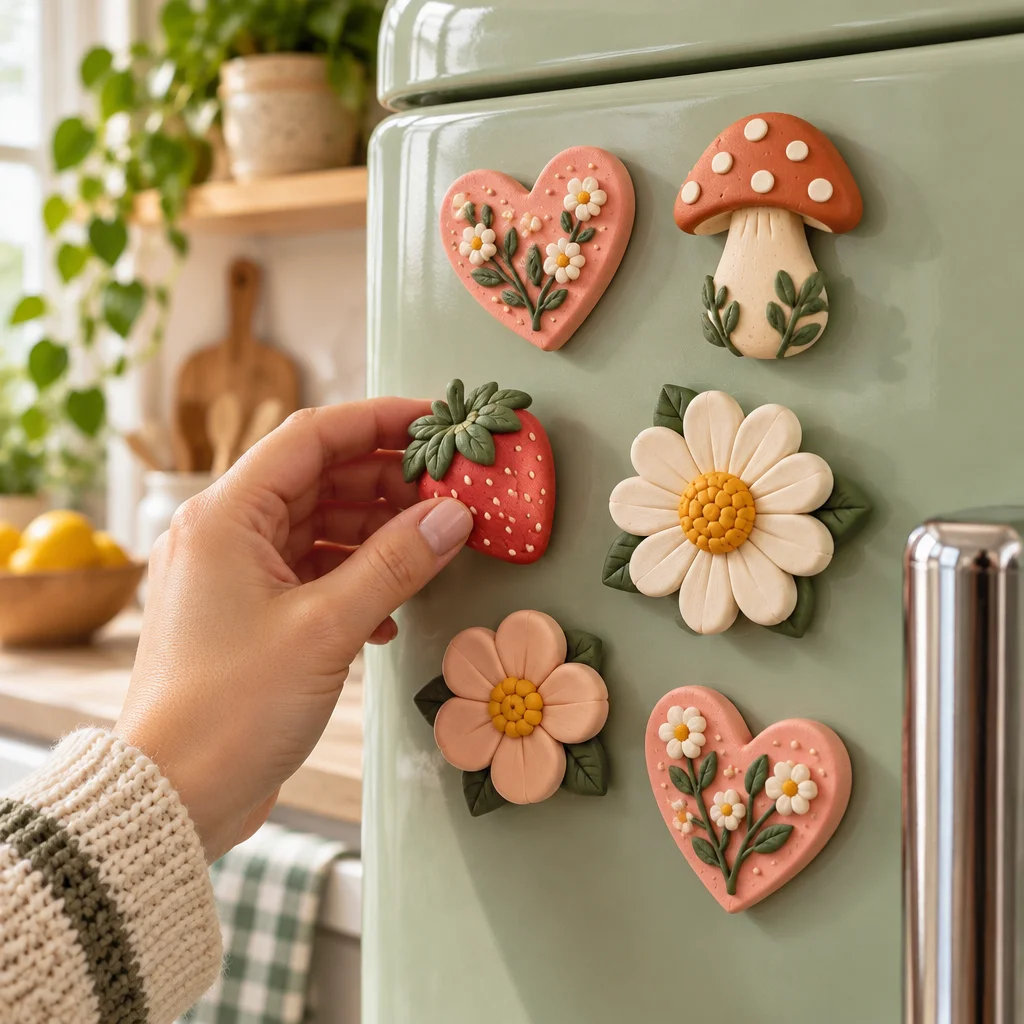
- Botanical shapes: Leaves, daisies, and mushrooms. Add vein texture with a toothpick and shade with soft pastel for depth.
- Initials and words: Cut letter shapes or stamp them. Keep letters thick enough that they do not snap at narrow points.
- Seasonal sets: Stars and trees in winter, hearts in February, lemons in summer. You can pair the theme with Christmas craft printables for gift tags or packaging.
- Marbled “stone” magnets: Twist two or three colors lightly and roll once or twice to create a marble look. Avoid overmixing or it turns muddy.
- Textured “knit” effect: Press a textured fabric lightly into clay, then trim into circles. If you love fiber crafts, a set of floral magnets can complement a project like an easy crochet flower pattern displayed nearby.
For gifting, make sets of 6 to 10 magnets, bundle them in a small box, and include care instructions: avoid soaking in water and do not pry the magnet off the surface by the clay piece.
Common Mistakes and How to Avoid Them
Most polymer clay magnets fail for predictable reasons, and the fixes are straightforward. The most common issue is underbaking. Underbaked polymer clay is weak and can snap if dropped. Always use an oven thermometer and follow your brand’s recommended temperature and time. If you are unsure, it is generally better to bake a bit longer at the correct temperature than to bake too hot for a shorter time.
Warping happens when pieces are too thin, unevenly rolled, or moved while warm. Keep thickness consistent, bake on a flat tile, and let magnets cool fully before lifting. If you frequently get curved pieces, try baking between two sheets of parchment with a second tile on top for gentle pressure, but do not crush raised details.
Magnets popping off usually means the glue choice was wrong or the surfaces were too smooth. Hot glue often fails over time. Instead, lightly roughen the clay back and use two-part epoxy. Also ensure the magnet is oriented correctly before gluing. Stack magnets to find the attracting face, then mark it with a pen.
Sticky or cloudy sealant is a finish compatibility problem. Some nail polishes and aerosol sprays can stay tacky on polymer clay. Use water-based polyurethane or a finish labeled safe for polymer clay, and let it cure in thin coats.
Frequently Asked Questions About DIY Polymer Clay Magnets: Easy Handmade Designs
How do you make polymer clay magnets?
Make the clay piece first, bake it according to the clay brand’s instructions, cool completely, then glue a strong magnet to the back using epoxy. Focus on even thickness (about 1/8 to 1/4 inch) and clean edges. For sets, cut multiple shapes from one rolled slab so they match. The key is correct baking and a strong adhesive bond after baking.
What type of magnets work best?
Neodymium disc magnets are usually best because they are compact but very strong, which helps your polymer clay magnets actually hold paper without sliding. Choose a size that fits your design, often 8 to 12 mm discs for small pieces. Ceramic magnets can work, but you may need a larger magnet or two magnets per piece to get a good hold.
How do you attach magnets to baked clay?
For the most reliable attachment, scuff-sand the clay where the magnet will sit, wipe away dust, then use a two-part epoxy. Press the magnet in place and let it cure fully, usually several hours. Keep glue away from the magnet face that touches the fridge so it sits flat. If you use super glue gel, use it only for lightweight magnets and give it extra curing time.
Do you bake magnets with polymer clay?
In most cases, do not bake the magnets inside the clay. Many magnets can tolerate heat, but adhesives and coatings can fail, and you risk discoloration or weaker magnet strength depending on the type. A safer approach is to bake the clay first, then glue the magnet afterward. If you want an embedded look, create a shallow recess in the clay, bake, then glue the magnet into the recess after cooling.
How do you seal polymer clay magnets?
Sealing is optional because properly baked polymer clay is durable on its own. Seal if you want gloss, added scratch resistance, or easier cleaning. Use a polymer-clay-safe varnish or water-based polyurethane in thin coats. Let each coat dry and cure fully before using. Avoid nail polish or unknown aerosol sprays because they can turn sticky or cloudy on polymer clay.
What are easy clay magnet shapes for beginners?
Start with shapes that have no thin points: circles, rounded hearts, simple stars with chunky tips, rainbows, fruits like oranges or lemons, and basic flowers with thick petals. These designs are forgiving, easy to smooth, and less likely to snap. You can upgrade the look with simple texture (dots, lines, or fabric imprint) and a clean color palette.
Final Thoughts
Making polymer clay magnets is a satisfying, low-stress craft that gives you quick wins and practical results. Start with a small set of simple shapes, focus on even thickness and correct baking, then use epoxy to attach strong magnets so they last. Once you like your process, experiment with themes, textures, and seasonal color palettes for gifts and home decor.
If you want another perspective and extra design inspiration, bookmark DIY Magnets with Polymer Clay – 1905 Farmhouse and compare techniques. Your next step: choose 2 to 3 colors, cut 6 matching shapes, and make your first coordinated magnet set this weekend. With a little practice, your fridge can look like a mini handmade gallery.