DIY Polymer Clay Coasters: Easy Handmade Tutorial
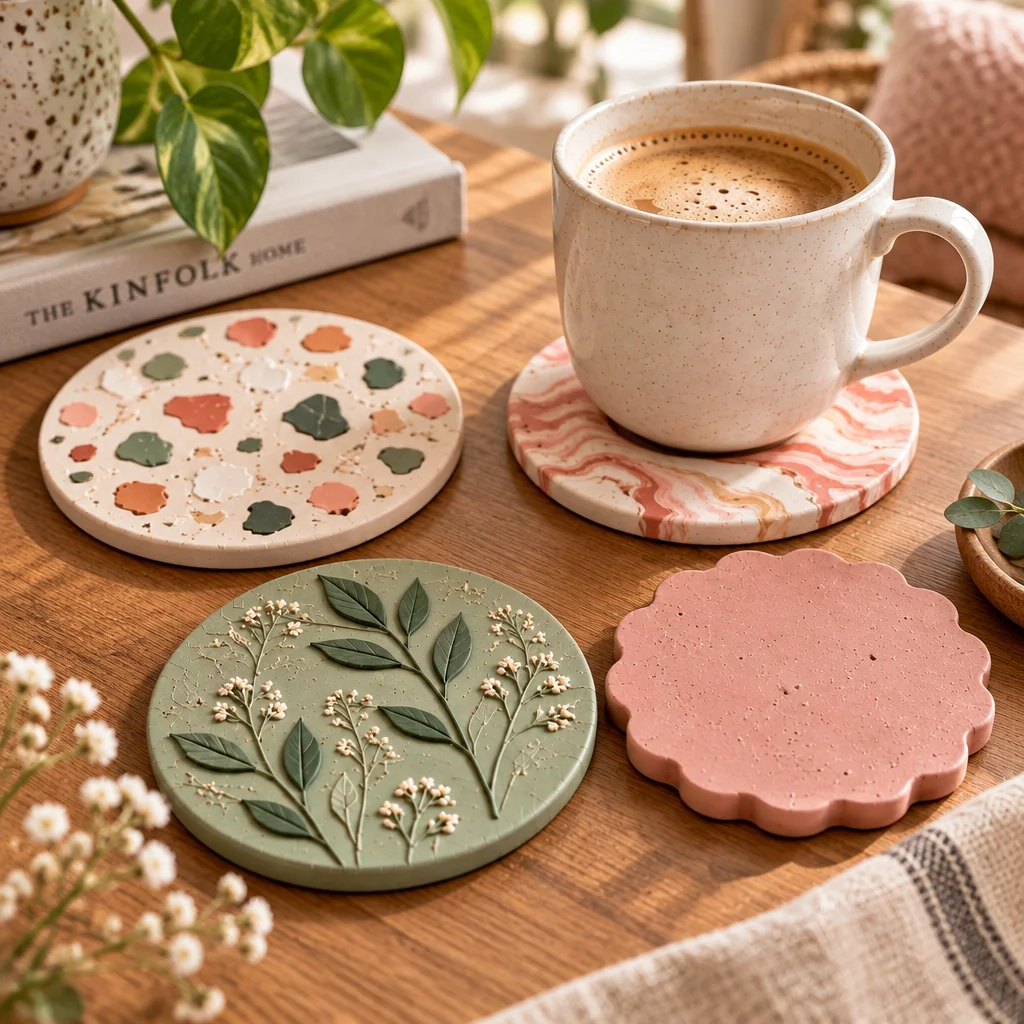
Making polymer clay coasters is one of those satisfying beginner projects that looks high-end but is genuinely doable at a kitchen table. In this tutorial, you will create a set of durable, wipeable coasters that protect your furniture and add a pop of handmade style to your living space. I will walk you through choosing the right clay, rolling and cutting consistent shapes, baking safely, and finishing the surface so it stands up to condensation and daily use.
If you enjoy quick, practical crafts, you might also like these printable crafts for kids for easy family crafting sessions, or this easy crochet flower pattern if you want a soft, textured accent to pair with your new coasters (think mug rugs and cozy coffee corners). By the end, you will have coasters you can gift, keep, or customize for every season.
What You Need to Know Before Starting
Polymer clay is a PVC-based modeling material that hardens in a home oven at a low temperature, which makes polymer clay coasters approachable even if you have never crafted with clay before. The main thing to understand is that polymer clay is not like air-dry clay. It stays workable until baked, so you have time to adjust designs, but you must cure it properly for strength.
Difficulty level: Beginner to confident beginner. The steps are simple, but neat results depend on even thickness and careful handling.
Estimated time: About 60 to 90 minutes of hands-on time, plus baking and cooling. If you add sanding and sealing, plan for a little longer.
Project size: Most coasters are 3.5 to 4 inches wide. A set of four is a great first goal because it teaches consistency without feeling overwhelming.
Safety and setup notes: Work on a smooth, wipeable surface. Wash hands after handling clay. Use dedicated craft tools where possible, and avoid using tools for food afterward. Ventilate the area while baking and follow the clay brand’s temperature instructions. Overheating polymer clay can create unpleasant fumes, so an oven thermometer is worth it.
Finally, decide your “look” before you start rolling. Simple terrazzo chips, marbling, or a clean minimalist color block all work beautifully for coasters.
Supplies, Tools, and Material Choices
Good supplies make polymer clay coasters easier and more consistent. You do not need an expensive setup, but you do want a few basics that help you control thickness, edges, and finish.
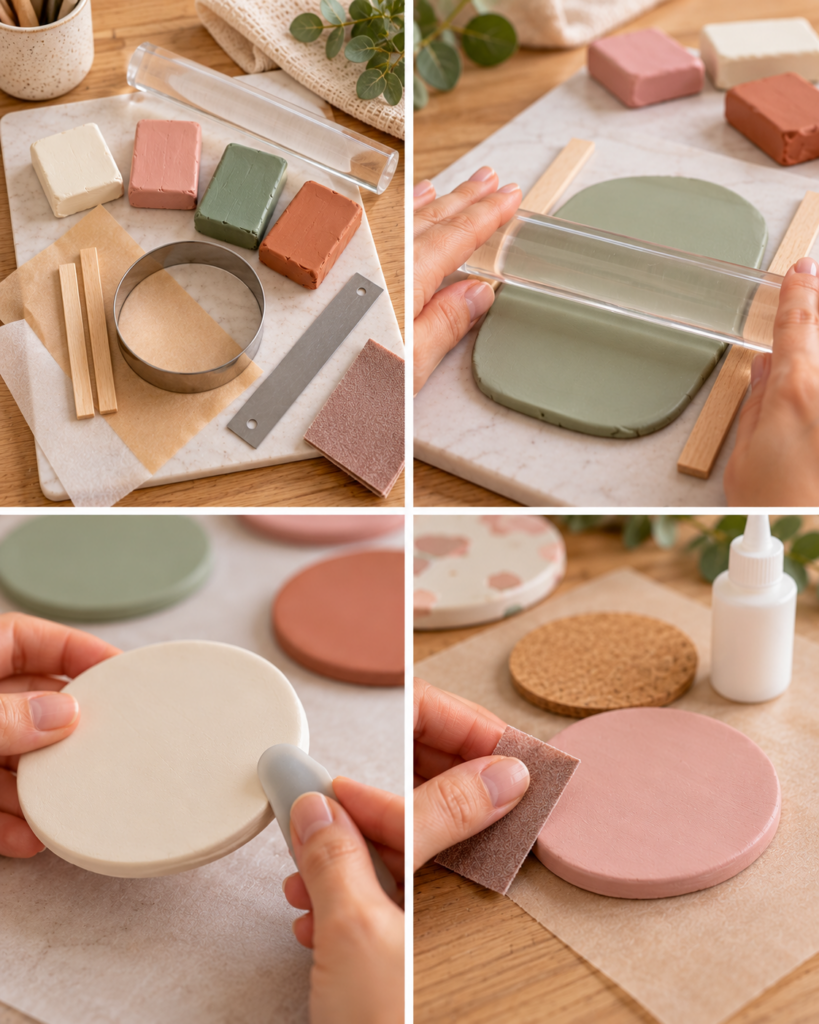
- Polymer clay: Choose a reputable brand (for example, Sculpey Premo, Fimo Professional, or Cernit) for strength. Softer clays condition easily; firmer clays hold crisp edges. Buy 2 to 4 colors for a simple palette.
- Roller or acrylic brayer: A dedicated clay roller gives even pressure. A smooth acrylic roller is easiest to clean.
- Thickness guides: Two paint stir sticks, craft sticks, or stackable guide rings help you roll slabs evenly. This matters for coasters because uneven thickness can cause rocking.
- Cutter or template: A round cutter (3.5 to 4 inches) is fastest. You can also trace around a glass jar lid with a craft blade.
- Craft blade: For clean cuts, trimming, and design details. Use carefully and store safely.
- Parchment paper and a baking tile or sheet: Parchment prevents sticking; a ceramic tile helps distribute heat for flatter coasters.
- Sanding supplies (optional but recommended): Wet/dry sandpaper in 400, 600, and 1000 grit for smooth edges.
- Sealant (optional): A water-based polyurethane or polymer-clay-safe varnish can add extra moisture resistance. Many finishes are already durable without sealing, but sealants are helpful for painted details or gold leaf.
- Cork or silicone feet: Adds grip and protects tabletops from tiny scratches.
If you plan to craft with kids nearby, set aside some simple paper activities too. These printable crafts for kids keep little hands busy while you focus on cutting and baking.
How to Make or Use It (Clear Beginner-Friendly Tutorial)
This step-by-step method works for most styles of polymer clay coasters, including solid colors, terrazzo, and marbled designs. Read through once before you start so you can move smoothly from conditioning to baking.
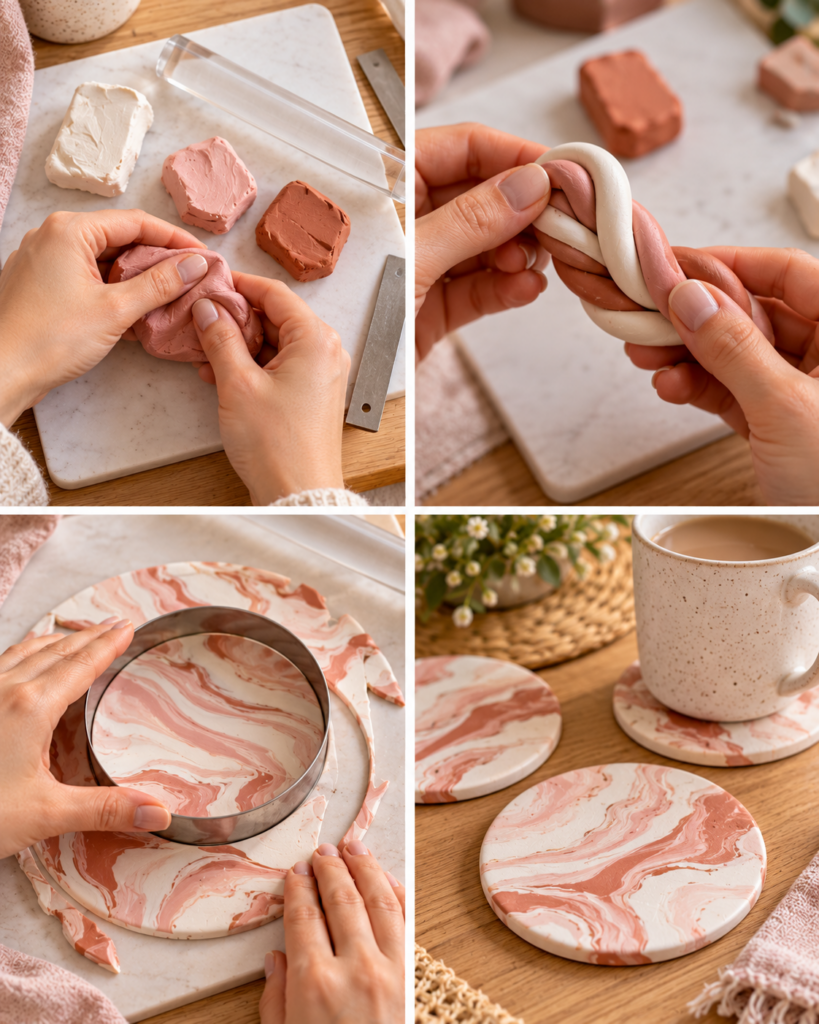
- Condition the clay thoroughly. Knead each color until it is pliable and smooth. Conditioning reduces cracking and weak spots after baking. If your clay is very firm, warm it in your hands first and slice it into thin pieces before kneading.
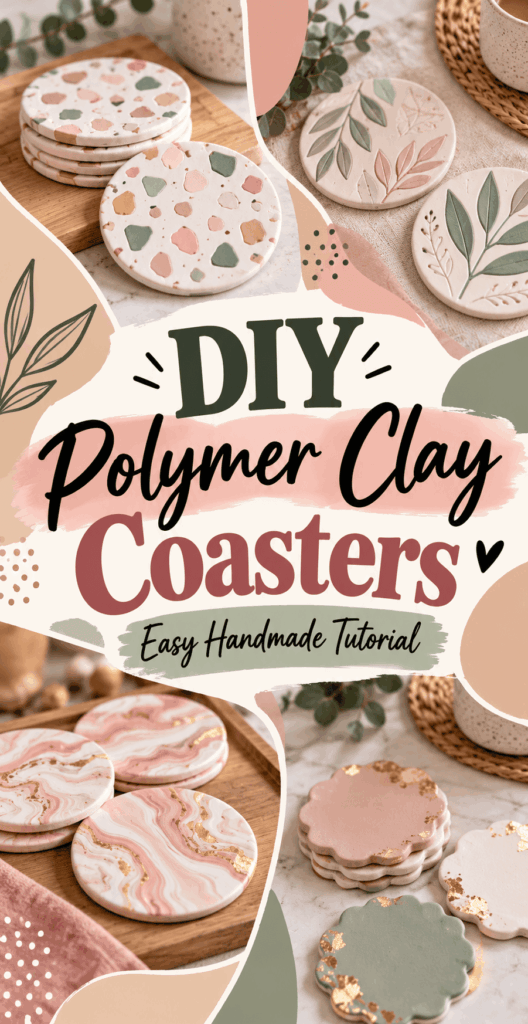
- Create your pattern. For terrazzo, chop small “chip” pieces and scatter them onto a base color. For a simple marble, twist two or three colors together, fold, and twist again until you see soft veining. Stop before it becomes a single blended color.
- Roll an even slab using thickness guides. Aim for about 1/4 inch (6 mm). Roll from the center outward, rotating the slab to prevent sticking and stretching. Even thickness is the biggest factor in coasters that sit flat.
- Cut your coaster shapes. Press the cutter straight down for clean edges. If using a blade and template, hold the blade vertical. Remove excess clay carefully so you do not distort the circles.
- Refine edges and surface. Smooth the rim with a fingertip or a silicone shaper. If you want crisp edges, leave them; if you want a soft look, gently round them. Pop any trapped air bubbles with a pin and smooth the spot.
- Bake on a flat, supported surface. Place coasters on parchment over a ceramic tile or a heavy baking sheet. Bake according to your clay brand’s instructions (temperature and time vary). Use an oven thermometer to avoid overheating and scorching.
- Cool completely before handling. Polymer clay firms as it cools. Moving pieces while warm can cause slight warping.
- Sand and buff (optional but professional-looking). Wet-sand edges with 400 grit, then 600, then 1000, rinsing often. This removes roughness and makes the coaster feel finished in your hand.
- Add backing and feet. Stick cork circles or pads to the underside, or add four small silicone feet. This prevents sliding and keeps moisture from sitting underneath.
Helpful Tips for Better Results
These small habits make a big difference in how your polymer clay coasters look and perform, especially if you are making a matching set.
- Measure once, repeat easily: Make one “perfect” coaster first, then use it as a thickness and size reference for the rest. Consistency looks polished on a coffee table.
- Prevent shiny fingerprints: Wash and dry hands often, and handle light colors by the edges. If you notice prints, lightly rub the surface with a bit of isopropyl alcohol on a soft cloth before baking.
- Keep dust away: Polymer clay attracts lint. Cover your slab with a clean sheet of paper when you pause, and wipe your work surface first.
- Get flat coasters: Bake on a tile and do not bake on a thin, warped cookie sheet. If you often struggle with curling edges, tent a piece of parchment over the top to reduce direct heat exposure.
- Use a controlled marble: For crisp marbling, do fewer twists. For subtle marbling, do more. If you love the marble look, this tutorial is a great inspiration: Marbleized Polymer Clay Coasters – Cali Girl In A Southern World.
“I made my first set of four coasters using the terrazzo idea, and the thickness guides were the game changer. They came out flat, and adding cork backing stopped them from sliding on our dining table.”
Creative Variations and Project Ideas
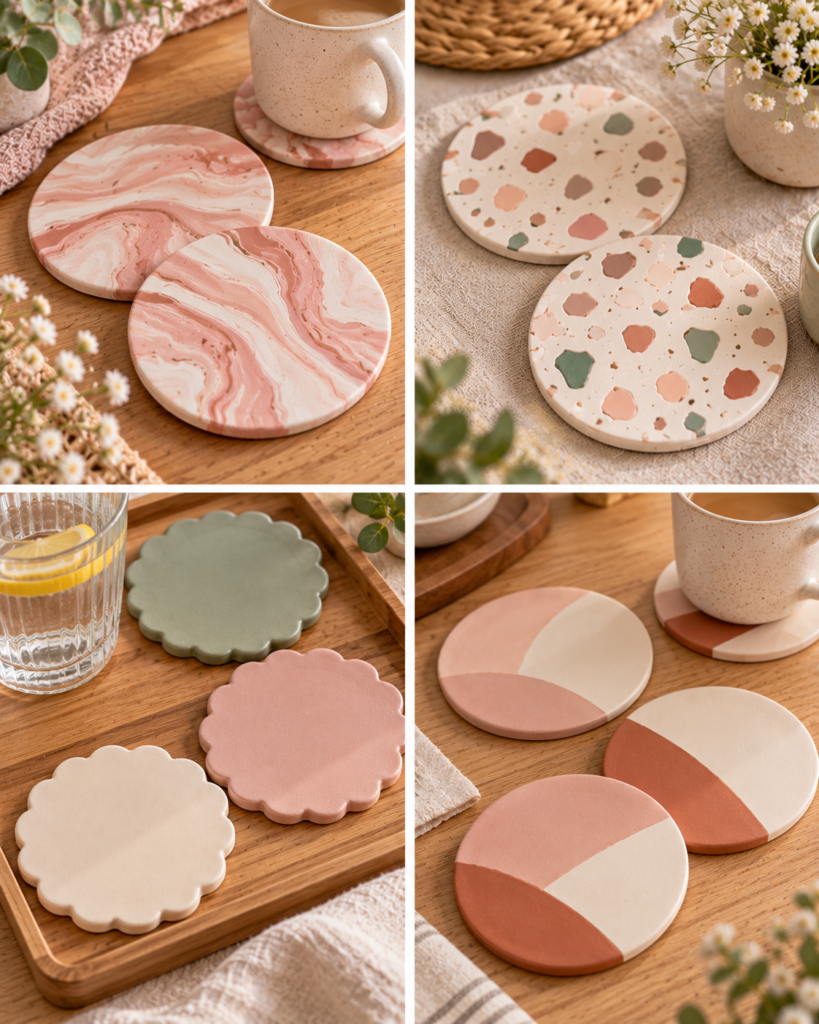
Once you master the basics, polymer clay coasters are incredibly customizable. You can change the shape, surface effect, and finishing details to match your home or create themed gifts.
- Terrazzo with metallic accents: Mix in a few tiny gold or copper “chips” (use polymer clay metallics). Keep metallic pieces small so the surface stays level.
- Color-block minimalism: Create two or three wedges of color and join them into a circle. Burnish the seams gently so they do not separate during baking.
- Textured botanical prints: Press a clean leaf into the clay to imprint veins, then lift carefully. Highlight texture with mica powder after baking, or keep it matte for a natural look.
- Holiday sets: Use seasonal palettes and simple shapes like scalloped edges or subtle stamp patterns. For gift tags or coordinating packaging, these free Christmas craft printables are handy when you are putting together a handmade set.
- Monograms and simple inlays: Cut a letter shape from a contrasting color and inlay it into a shallow recess. This stays smooth and is more durable than raised letters.
- Matching table accessories: Make a small tray, spoon rest, or tealight base in the same colors. If you love crafting coordinated “hostess sets,” an easy apron sewing pattern can turn your coasters into part of a full handmade kitchen gift bundle.
Tip: If your design includes paint pen details, let the paint cure fully and seal afterward for better water resistance.
Common Mistakes and How to Avoid Them
Most issues with polymer clay coasters are easy to fix once you know what causes them. Here are the problems I see beginners run into most often, plus practical solutions.
- Coasters that rock or wobble: This usually comes from uneven thickness or a warped baking surface. Use thickness guides and bake on a ceramic tile. If a coaster is slightly uneven after baking, you can wet-sand the bottom on a flat surface to level it.
- Scorched or darkened clay: Your oven may run hot. Always use an oven thermometer and follow brand instructions. Shield pieces by tenting parchment above them, and avoid placing the rack too close to the heating element.
- Bubbles or pockmarks: Trapped air can appear when you roll quickly or fold clay without compressing. Roll slowly, and if you see a bubble, pop it with a pin and smooth the clay before baking.
- Cracking after baking: Under-conditioning or baking too hot can contribute. Condition thoroughly and bake at the correct temperature for the full time so the clay cures evenly.
- Sticky or cloudy sealant: Some sealers react poorly or need longer cure time. Use a water-based polyurethane or a polymer-clay-safe varnish in thin coats. Let each coat dry and cure according to the label before stacking coasters.
- Scratched tables: Even smooth clay can pick up grit. Add cork backing or silicone feet and wipe the underside clean occasionally.
If you want a kid-friendly craft day while you work on your coasters, keep a stack of easy activities nearby. These printable crafts for kids pair nicely with adult crafting time.
Frequently Asked Questions About DIY Polymer Clay Coasters: Easy Handmade Tutorial
Can you make coasters from polymer clay?
Yes, polymer clay is a great material for coasters because it cures into a durable plastic-like finish when baked correctly. The key is making them thick enough to feel sturdy and adding a non-slip backing like cork or silicone feet. For everyday drinks, polymer clay coasters hold up well, especially when the surface is smooth and easy to wipe clean.
Are polymer clay coasters heat resistant?
Polymer clay can handle warm mugs, but it is not meant for extremely hot cookware like a pot straight from the stove. For typical use such as coffee, tea, or a warm glass, they are generally fine. If you regularly place very hot items down, consider using a trivet instead, or make a thicker clay trivet with a cork backing to add insulation.
How thick should polymer clay coasters be?
A reliable thickness is about 1/4 inch (6 mm). This thickness helps the coaster stay flat, feel substantial, and resist snapping. You can go slightly thinner if you use a very strong clay and keep the coaster small, but beginners get the best results at 1/4 inch. Using thickness guides makes it much easier to keep a consistent set.
How do you prevent clay from cracking?
Start with well-conditioned clay and avoid letting it dry out with lots of lint and dust stuck to it. Condition until the clay is smooth and flexible, and do not rush the bake. Follow the manufacturer’s temperature and time so the clay cures all the way through. Also, avoid bending the coasters while warm. Let them cool fully on the baking surface before moving.
Should you seal polymer clay coasters?
Sealing is optional. Many polymer clay coasters can be left unsealed because cured polymer clay is naturally water-resistant. That said, a sealant is helpful if you add paint, mica powders, or metallic leaf, or if you want a specific sheen level. Choose a polymer-clay-safe, water-based polyurethane or varnish and apply thin, even coats, allowing full curing time before use.
How do you protect a table from moisture?
To protect your table from condensation, make sure the coaster surface is smooth and free of pits where water can sit. Add a cork backing or silicone feet so moisture does not get trapped underneath the coaster. If you notice rings under any coaster, wipe both the coaster and the table dry. A sealed surface can also help keep water from lingering on decorative layers.
Final Thoughts
Polymer clay coasters are a perfect weekend project: practical, giftable, and endlessly customizable. Start with a simple set of four in a palette you love, focus on even thickness, and bake on a flat tile for the best chance at perfectly level results. Once you are comfortable, try terrazzo chips, subtle marbling, or inspiration from this excellent guide on Marbleized Polymer Clay Coasters – Cali Girl In A Southern World. Your next step is easy: pick two coordinating colors, condition and roll with guides, and commit to making one “test coaster” first. After that, the rest of the set goes quickly and you will have a handmade upgrade for your everyday coffee routine.