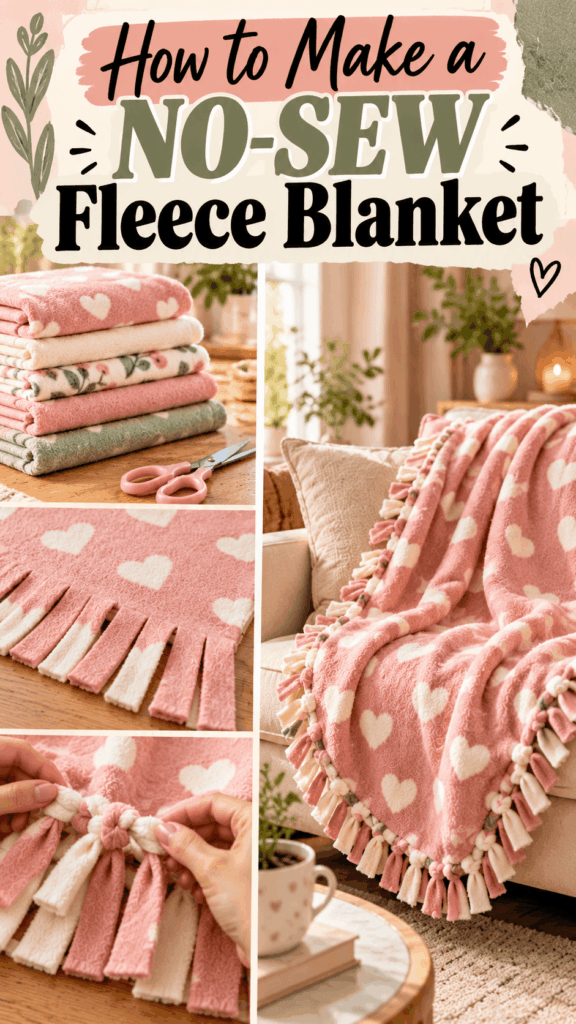
How to Make a No-Sew Fleece Blanket
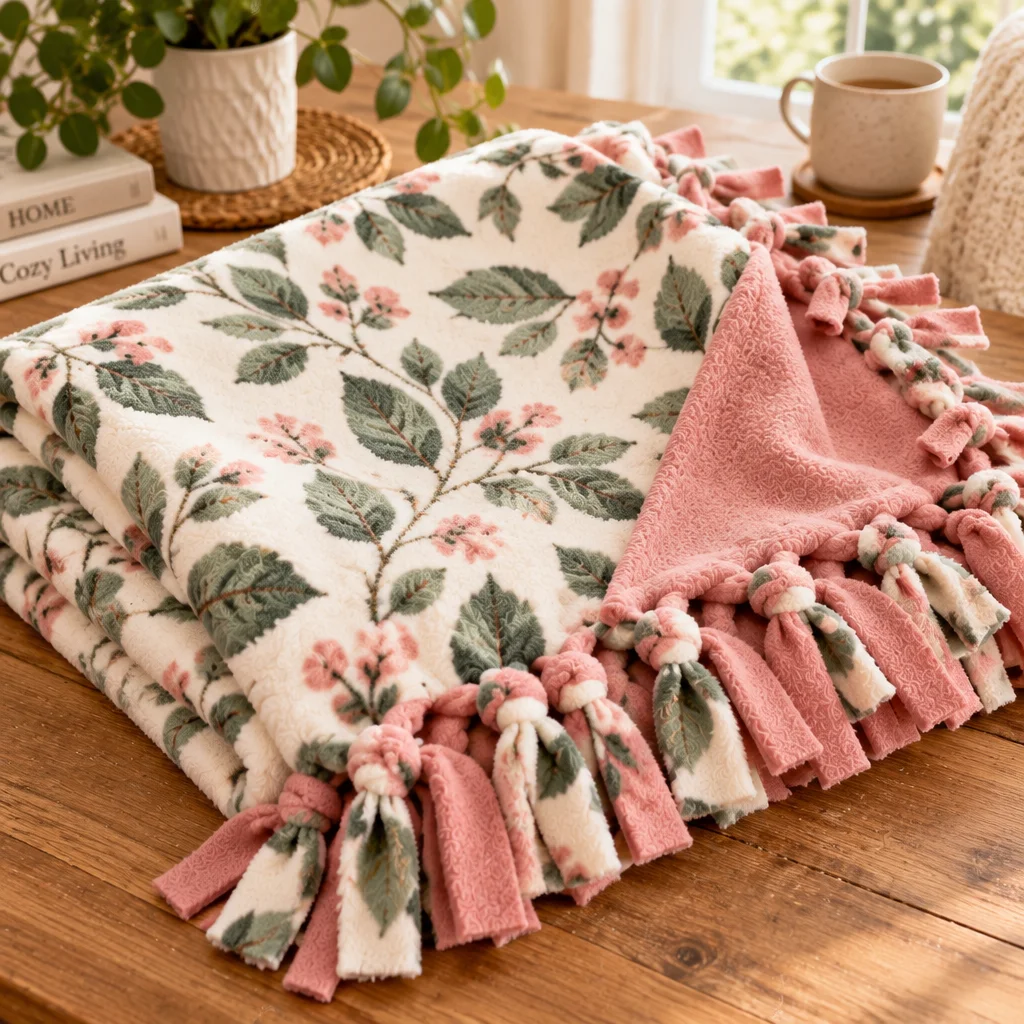
If you want a cozy, giftable project you can finish in an afternoon, a no sew fleece blanket is one of the best beginner-friendly crafts around. You get the look and warmth of a handmade throw without threading a needle, using a sewing machine, or learning tricky stitches. The finished blanket has a soft, fringed edge made by cutting and tying the fleece, and you can customize it for a couch throw, kid bed, dorm room, or pet blanket.
In this tutorial, I will walk you through fleece choices, simple measuring and cutting, and a reliable tying method that stays neat after washing. If you are building a handmade-gift “toolkit,” you may also like my easy apron sewing pattern tutorial for another practical project, or use that same beginner-friendly apron pattern guide when you are ready to try simple seams. For now, let’s make a blanket you can be proud of.
What You Need to Know Before Starting
A no sew fleece blanket works because fleece does not fray. When you cut fleece, the edges stay stable, which makes fringe finishes possible without hemming. The classic version uses two layers of fleece tied together around the perimeter, creating a thicker, reversible blanket. You can also make a single-layer version with knotted fringe, but the two-layer blanket feels more substantial and hides the underside of the knots.
Difficulty level: Easy. The most “advanced” skill is cutting straight strips and tying consistent knots.
Time estimate: About 1 to 2.5 hours, depending on blanket size and how careful you are with measuring and trimming fringe.
Best project sizes: Baby blanket (about 1 to 1.5 yards per layer), lap throw (1.5 to 2 yards), or twin-size (2.5 to 3 yards). You can scale up, but large blankets take longer to cut and knot.
Space: A clean floor or big table helps. Fleece attracts lint and pet hair, so start with a swept surface if you can.
Safety note: Use sharp scissors or a rotary cutter carefully and keep fingers clear when cutting multiple layers. If kids are helping, let them tie knots while an adult handles the cutting.
Supplies, Tools, and Material Choices
Choosing the right materials is what makes your no sew fleece blanket look tidy and last through washing. Fleece varies a lot in thickness and stretch, and those differences affect how neat your fringe looks.
- Fleece fabric (2 pieces): Anti-pill fleece is a great choice because it resists fuzzing and stays smoother over time. Blizzard fleece is thicker and warmer but can be bulkier to knot. Try to use two pieces that feel similar in weight so the blanket hangs evenly.
- Sharp fabric scissors or a rotary cutter and mat: Scissors work fine, but a rotary cutter is faster for long, straight fringe cuts. If you use a rotary cutter, use a self-healing mat and cut away from your body.
- Ruler or measuring tape: A clear quilting ruler is ideal for marking fringe width and length consistently.
- Fabric-safe marking tool: Chalk, a washable fabric pen, or even painter’s tape can help you mark cut lines. Test on a scrap first.
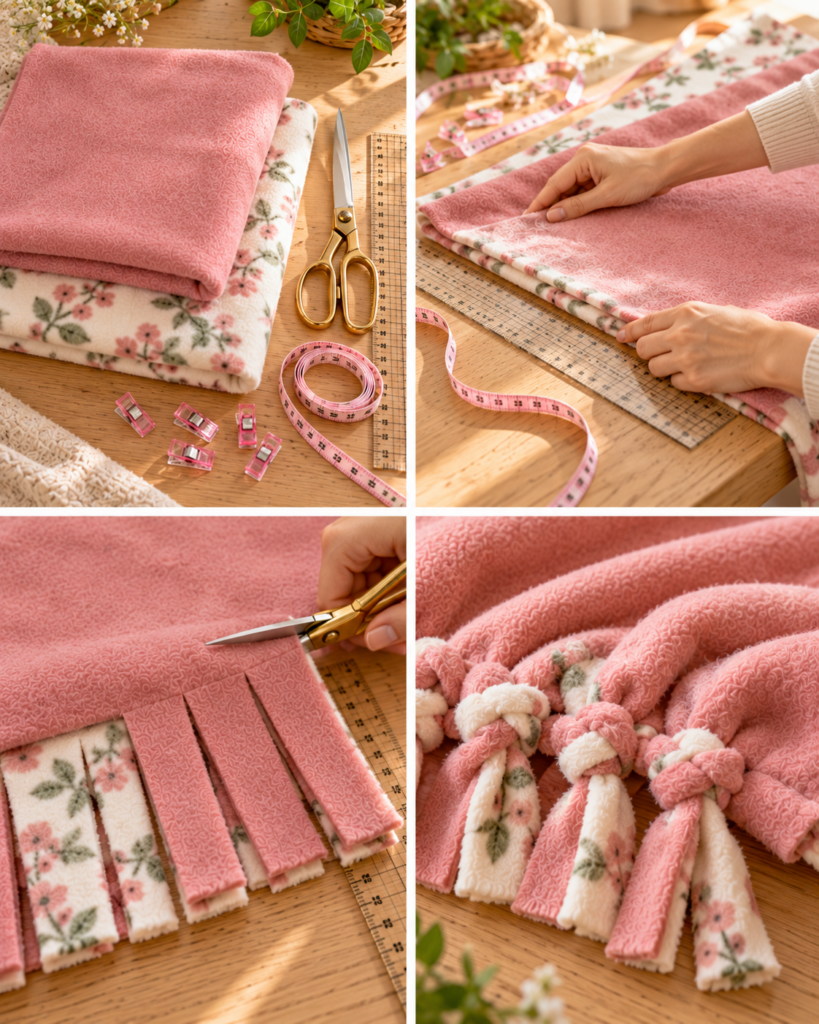
- Clips or heavy books: Optional, but helpful to keep layers aligned while cutting. Pins can leave visible holes in some fleece, so clips are often better.
If you are planning a whole set of handmade gifts, consider pairing your blanket with something wearable like an apron. This easy apron sewing pattern is a nice next step because it teaches basic measuring and straight seams without being overwhelming.
How to Make or Use It (Clear Beginner-Friendly Tutorial)
This method makes a tidy, double-layer no sew fleece blanket with evenly spaced fringe and secure knots. Read through once before you cut, then take it step by step.
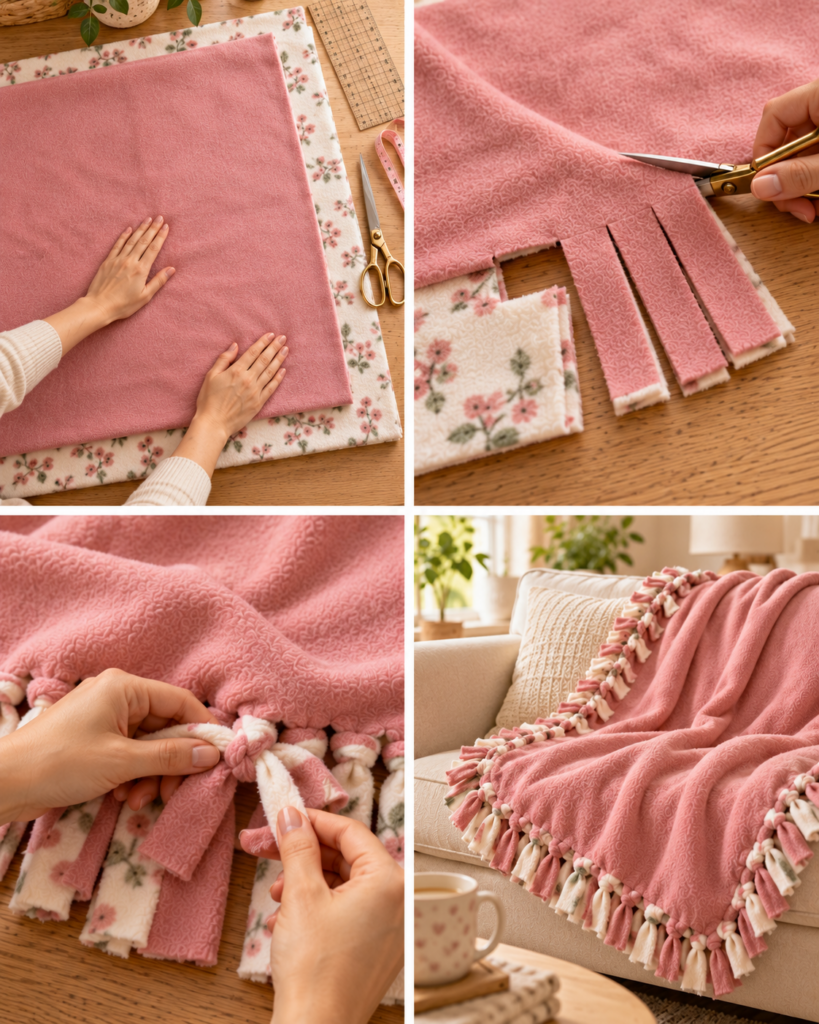
- Pre-trim the fleece edges. Lay each piece of fleece flat and square up the factory edges if they are wavy. Fleece edges are often slightly curved from being wound on a bolt. Trimming now helps your blanket look straight and prevents “creeping” mismatch later.
- Choose your finished size and align layers. Place the two fleece pieces wrong sides together (or simply put the sides you want facing outward). Smooth from the center outward to remove wrinkles. If patterns are directional, make sure both are oriented the way you want.
- Square the corners and cut corner blocks. Cut a 4 inch by 4 inch square from each corner through both layers. This is important because it removes bulk so your fringe can turn the corner neatly. For a smaller blanket, 3 inch squares can work. For thicker fleece, 4 to 5 inches is easier to knot.
- Mark your fringe length. From the new corner cut, measure in about 4 inches along each edge and mark lightly. This 4 inch fringe length is a reliable “sweet spot” for tying knots without looking floppy. You can go to 5 inches for chunkier fleece, or 3 inches for a more compact edge.
- Cut fringe strips all the way around. Cut 1 inch wide strips from the edge inward to your 4 inch mark, through both layers at the same time. Keep the strips as even as possible. If you want a finer fringe, use 3/4 inch strips, but know you will tie more knots.
- Tie the knots consistently. Take one top strip and the matching bottom strip, then tie a firm double knot (like tying your shoelaces but without a bow). Tighten snugly, but do not yank so hard that the fleece curls. Work around the blanket, keeping knot tension consistent for a cleaner edge.
- Check alignment and fix as you go. Every 10 to 15 knots, smooth the blanket flat and confirm the layers are still aligned. If one layer is creeping longer, gently stretch the shorter layer to match and keep going.
- Final tidy-up. Once all knots are tied, trim any fringe pieces that look longer than the rest. A small trim makes the blanket look surprisingly “finished.”
If you like photo-heavy tutorials as a companion, this is a solid reference: No Sew Fleece Blanket : 7 Steps (with Pictures) – Instructables. It is helpful for seeing how the corner squares and fringe look at each stage.
Helpful Tips for Better Results
Small adjustments make a big difference in how professional your no sew fleece blanket looks. These tips help you get straighter fringe, neater knots, and fewer surprises after washing.
- Use a “cut line” guide. Instead of measuring each strip from scratch, place painter’s tape at the 4 inch mark all around the blanket. Then you can cut until you hit the tape edge. It speeds things up and keeps fringe consistent.
- Cut with the least stretch direction when possible. Fleece stretches more in one direction. If you cut fringe along a super-stretchy edge, your strips may deform while tying. If your pattern allows, rotate fabric so the less-stretchy direction runs along the longest edges.
- Keep knot direction consistent. Tie each knot the same way (for example, always cross left over right first). This makes the edge look uniform and helps the knots sit similarly.
- Adjust fringe length for bulk. Thick fleece needs longer fringe to tie comfortably. If your knots feel cramped, increase fringe length to 5 inches. If knots feel floppy, shorten to 3 inches on the next blanket.
- Work on a hard surface if you can. Carpet can “eat” your measurement accuracy. A table is ideal, but a clean floor works great if you tape your ruler down occasionally.
“I made my first no sew fleece blanket for my nephew and was nervous about the corners. Cutting the 4 inch corner squares made it so much easier, and tying knots in batches kept everything even. It looked store-bought once I trimmed the fringe at the end.”
Creative Variations and Project Ideas
Once you master the basic no sew fleece blanket, you can personalize it in ways that fit your space, season, or gift recipient. These ideas are beginner-friendly and do not require extra tools beyond what you already used.
- Single-layer fringe throw: Use one piece of fleece and knot each strip onto itself (fold each strip and pull the tail through). This makes a lighter blanket, great for warmer climates or as a couch layer.
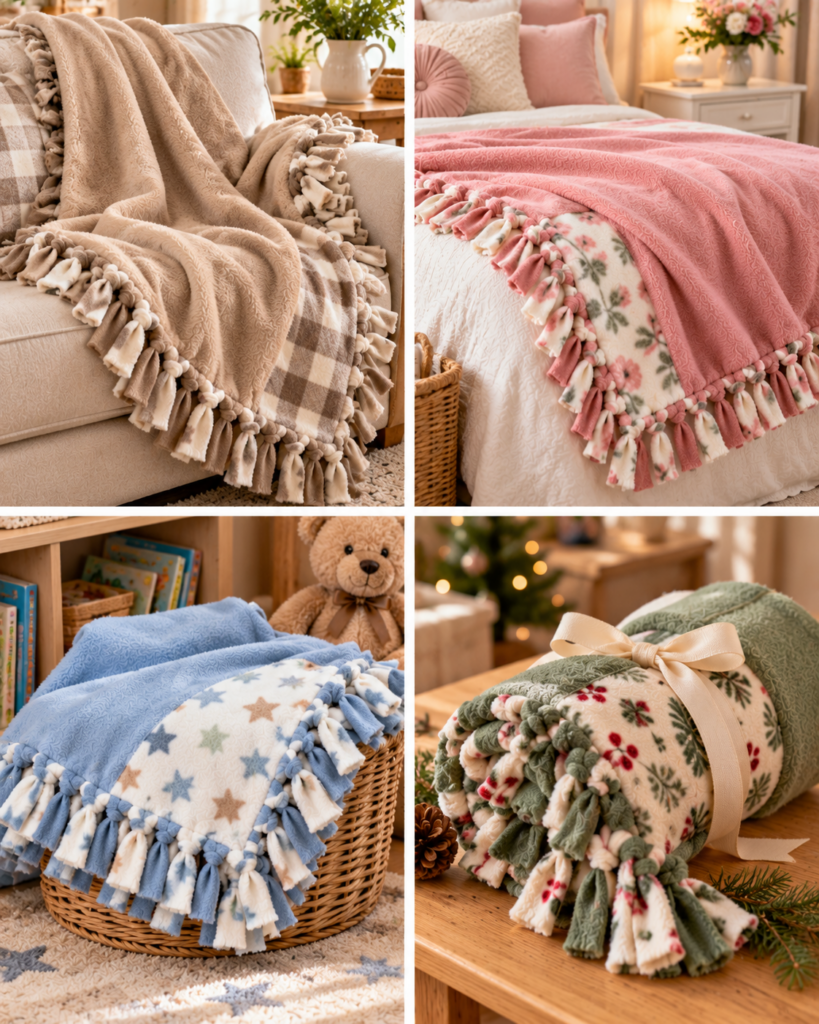
- Reversible themed blanket: Pair a bold print on one side with a solid color on the other. This looks especially nice for kids’ rooms and lets you “flip” the vibe instantly.
- Extra-wide plush edge: Cut 5 to 6 inch fringe and tie larger knots for a chunky border. This is cozy for winter blankets and hides slight cutting unevenness.
- Patchwork-look blocks: You can piece together large fleece rectangles (using fabric glue designed for no-sew projects) before making fringe, but keep seams simple and flat so the edge does not get lumpy.
- Pet blanket or crate liner: Use smaller dimensions and shorter fringe. For pets who chew, consider a no-fringe version (two layers tied only at the corners) or supervise use to avoid chewing hazards.
If you are building a set of handmade home items, making a matching apron can be fun for a movie-night or crafting theme. Here is that easy apron sewing pattern again as a simple skill-builder after you finish your blanket.
Common Mistakes and How to Avoid Them
Most issues with a no sew fleece blanket come from cutting inconsistently or tying too tightly. The good news is that nearly all problems are fixable with small adjustments.
- Uneven fringe width: If some strips are 1 inch and others are 1.5 inches, your knots will look irregular. Prevent this by marking every few inches with a ruler or using a quilting ruler as a cutting guide. If you already cut unevenly, trim wider strips narrower where possible.
- Fringe cut too short to tie: If you cut 2 inches of fringe on thick fleece, it becomes frustrating to knot. Fix it by switching to a simpler single knot (instead of a double knot) and tighten gently, or add a narrow tied ribbon around the edge as a decorative rescue. Next time, use 4 to 5 inches.
- Corners bunch up: This usually happens when corner squares are too small. Cut a slightly larger square (for example, upgrade from 3 inches to 4 inches) on future blankets. If it is already tied, you can untie the last few knots near the corner, trim the corner opening larger, then re-knot.
- Wavy edges after tying: Over-tightening stretches fleece and creates ripples. Tie snugly but stop as soon as the knot is secure. If it is already wavy, gently steam from a distance (do not touch the iron to fleece) or wash and lay flat to dry, then “massage” the edge straight.
- Layers shifting while cutting: Fleece slides. Use clips, heavy books, or even a few pieces of painter’s tape to keep layers aligned before you cut fringe.
Frequently Asked Questions About How to Make a No-Sew Fleece Blanket
How do you make a no-sew fleece blanket?
Layer two pieces of fleece with the “pretty” sides facing outward, square them up, and cut matching corner squares (commonly 4 inches). Then cut 1 inch wide fringe strips about 4 inches deep all around the edge through both layers. Tie each pair of strips together with a snug double knot. Work evenly around the blanket, smoothing layers as you go, and trim fringe at the end for a polished look.
How much fleece do you need for a blanket?
It depends on the finished size and whether you want one or two layers. For a small baby blanket, 1 to 1.5 yards of fleece per layer is typical. For a lap throw, 1.5 to 2 yards per layer works well. For a twin-size blanket, plan on 2.5 to 3 yards per layer, depending on fabric width. Remember to account for fringe on all sides when deciding your cut size.
Can you make a no-sew blanket without knots?
Yes, but it is a different construction. Instead of tying, you can cut fringe and weave strips through slits to create a braided or looped edge, or you can use fleece blanket “laces” cut from the fabric itself. Some people also use fabric-safe tie closures or add binding, but that often becomes more complex than knotting. For true beginner simplicity and durability, knots remain the most reliable no-sew option.
What is the easiest fleece blanket edge?
The easiest edge is the classic tied fringe: cut corner squares, cut evenly spaced fringe strips, and tie double knots all the way around. It requires no special tools beyond scissors and a ruler, and mistakes are easy to correct because you can untie and redo a section. If you want an even quicker finish, a single-layer fringe with simple loop knots is fast, but it produces a lighter blanket.
How do you keep fleece edges even?
Start by squaring the fleece before layering, since factory edges can be curved. Measure and mark fringe length (for example, 4 inches) consistently around all sides, using painter’s tape or a ruler as a guide. Cut strips in batches, checking that your scissors stay perpendicular to the edge. As you tie, pause often to smooth the blanket flat and confirm the layers are still aligned so one side does not creep longer.
Can you wash a no-sew fleece blanket?
Yes. Wash on cold or warm with a gentle cycle and mild detergent, especially if you used anti-pill fleece. Avoid high heat, which can make fleece feel less soft over time. Tumble dry low or air-dry flat. After washing, shake the blanket to fluff the fringe and check knots. If a knot loosens, simply retie it. Trimming any fuzzy fringe ends after a few washes can keep the edge looking fresh.
Final Thoughts
A no sew fleece blanket is one of those projects that feels almost magical: simple cuts, simple knots, and you end up with something genuinely useful and cozy. Pick two fleeces you love, take a few minutes to measure and square everything up, and the rest is just relaxing repetition. If you want extra visuals alongside this guide, the step-by-step photos in No Sew Fleece Blanket : 7 Steps (with Pictures) – Instructables are a great companion reference.
Your next step: choose your blanket size, grab your fleece, and cut those corner squares first. Once the corners are clean, the fringe and knots come together quickly. And if you catch the crafting bug, bookmark my easy apron sewing pattern for when you are ready to try a beginner sewing project after your blanket is finished.