Knit Stitch vs. Purl Stitch: Beginner Differences Explained
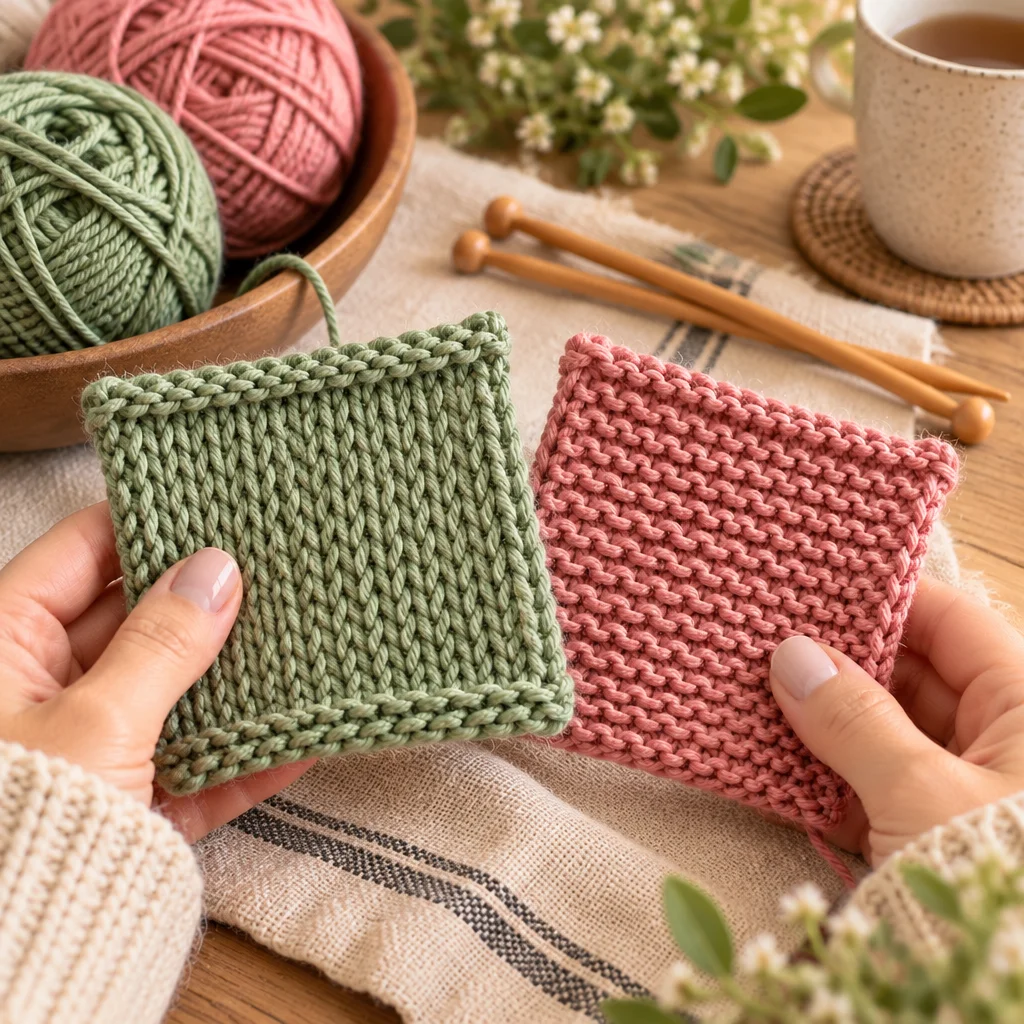
If you are comparing knit stitch vs purl stitch, you are already on the right track, because these two basics create almost everything you see in hand knitting. Once you can knit and purl comfortably, you can make smooth stockinette fabric, bouncy ribbing, textured seed stitch, and simple patterns that look impressively “advanced” even when you are a total beginner. In this guide, I will explain what each stitch looks like, how they behave in fabric, and exactly how to practice them without getting twisted or frustrated.
If you also enjoy other beginner-friendly crafts, you might like this collection of printable crafts for kids for quick wins, or this easy crochet flower pattern if you want to compare how crochet texture differs from knitting.
What You Need to Know Before Starting
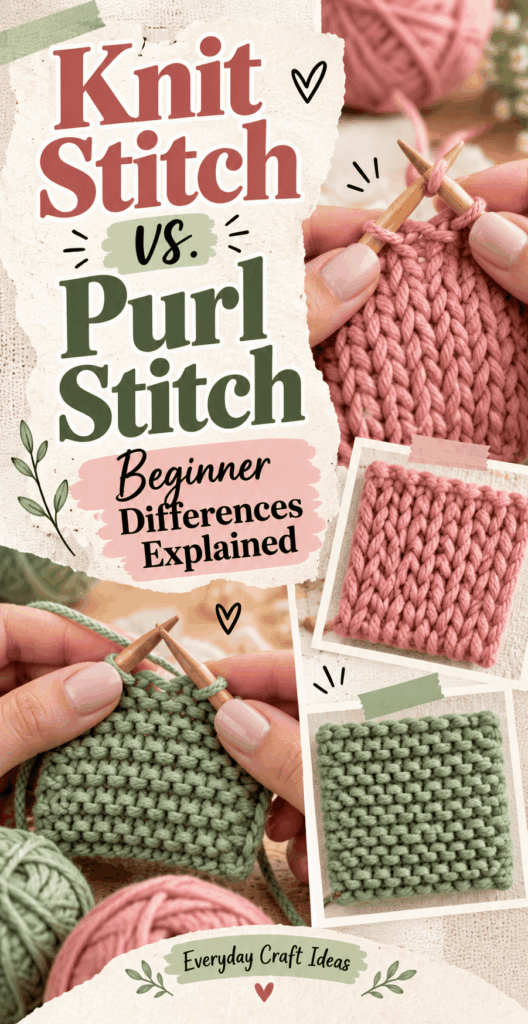
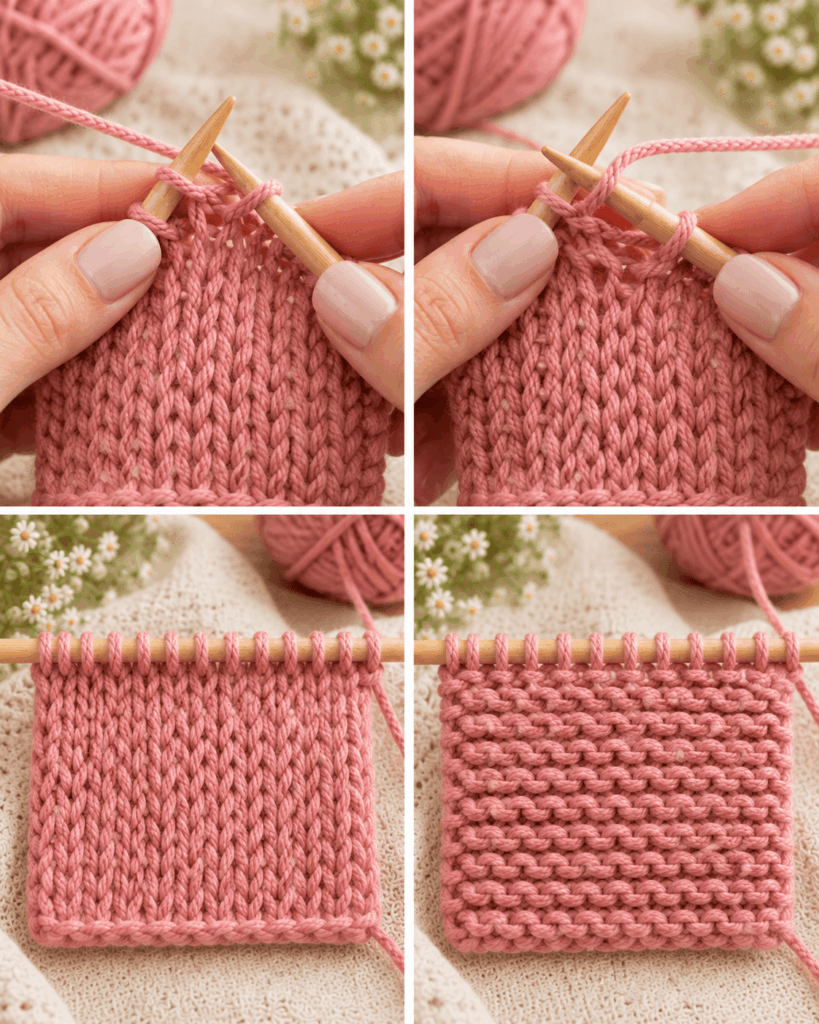
When people talk about knit stitch vs purl stitch, they are really describing two ways of forming the same type of loop from different sides of the fabric. A knit stitch is typically worked with the yarn held in back (for most Western-style knitting), creating a “V” shape on the side facing you. A purl stitch is typically worked with the yarn held in front, creating a small bump on the side facing you. Flip the fabric over, and those roles reverse: the back of a knit stitch looks like a purl bump, and the back of a purl stitch looks like a knit “V.”
Beginner expectation check: you do not need speed, fancy needles, or perfect tension to start. What you do need is the willingness to practice slowly and look closely at your stitches. Plan to knit a small swatch, not a full scarf on day one. A 20-stitch by 20-row practice square is enough to teach your hands what to do and your eyes what to look for.
Difficulty level is beginner, but “beginner” still includes two common hurdles: keeping your yarn in the correct position when switching between knit and purl, and learning to read your fabric so you can spot mistakes early. We will handle both clearly, step by step.
Supplies, Tools, and Material Choices
You can learn knit stitch vs purl stitch with very simple supplies, and the right choices make practice dramatically easier. Avoid slippery yarn and tiny needles at first. Your goal is visibility and control.
- Yarn: Choose a smooth, light-colored, medium-weight yarn (often labeled worsted or aran). Light colors help you see the “V”s and bumps. Avoid fuzzy novelty yarn because it hides stitch definition and makes it hard to fix mistakes.
- Needles: US size 8 (5 mm) or US size 9 (5.5 mm) straight needles or circular needles are friendly for beginners. Circular needles can be more comfortable because the weight of the fabric rests in your lap.
- Scissors: Any sharp pair that cuts yarn cleanly. A clean cut makes weaving ends easier later.
- Tapestry needle: For weaving in ends. A blunt tip slides between stitches without splitting yarn.
- Stitch markers (optional): Helpful for marking the “right side” or separating sections when you practice ribbing patterns.
If you want a clear visual diagram alongside your practice, the resource Knit vs Purl – the difference between these basic stitches [+diagram] is a useful companion for seeing how the yarn path changes between the two.
Before you start, wind your yarn into a ball if it came in a hank, and give yourself a comfortable workspace with good lighting. This is one of those crafts where posture matters: relaxed shoulders and supported wrists will help you keep tension even.
How to Make or Use It (Clear Beginner-Friendly)
The fastest way to truly understand knit stitch vs purl stitch is to make a small swatch that includes both stitches. The “project” here is a practice fabric you can keep as a reference for what different textures look like.
- Cast on 20 stitches. Use any beginner cast-on you know (long-tail is popular). Keep the cast-on edge relaxed, not tight, or the first row will be difficult to work into.
- Knit 6 rows (garter practice). Knit every stitch across each row. This teaches your hands the knit motion and creates garter stitch, which lies flat and helps you get comfortable handling the needles.
- Purl 2 full rows. Move the yarn to the front between the needles before you purl. Purl every stitch across for two rows. This helps you practice the purl motion without switching back and forth constantly yet.
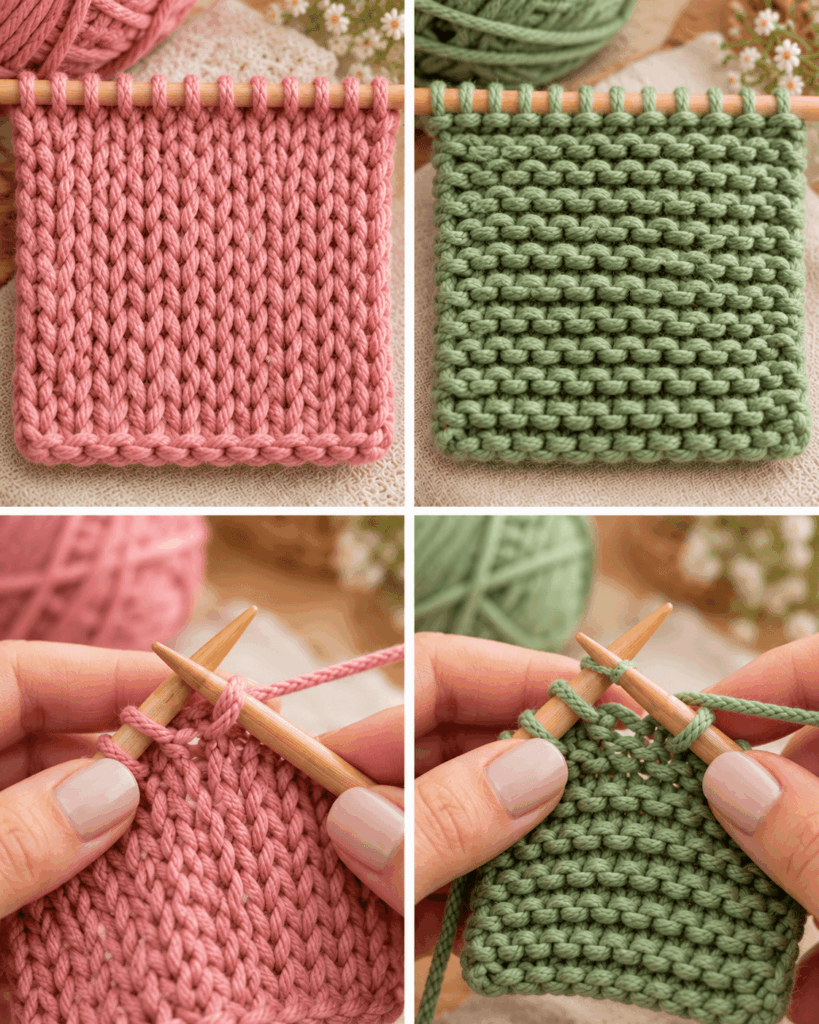
- Make 6 rows of stockinette. Row 1: knit across. Row 2: purl across. Repeat those two rows three times. Notice how one side becomes smooth “V”s and the other side becomes bumpy. This is the key “aha” moment for knit stitch vs purl stitch.
- Try ribbing for 6 rows. Work (K1, P1) across the row. On the next row, knit the knits and purl the purls as they appear. Ribbing teaches you to read your fabric and move yarn front/back neatly.
- Bind off. Bind off with a relaxed tension so the edge is not tighter than the fabric. Cut yarn leaving a 6-inch tail and pull through to secure.
- Weave in ends and label your swatch. Use a tapestry needle to weave ends through several stitches on the wrong side. Consider tying a small tag or writing notes on paper: “garter,” “purl rows,” “stockinette,” “K1P1 rib.” You will thank yourself later.
This single swatch teaches feel, look, and switching between stitches safely and confidently, which is exactly what beginners need.
Helpful Tips for Better Results
Small adjustments make a big difference when learning knit stitch vs purl stitch, especially if your stitches look uneven or you feel like you are “fighting” the yarn.
- Move the yarn between needles, not over them. When switching from knit to purl, bring the yarn forward between the needle tips. When switching from purl to knit, send it back between the needle tips. If you fling it over the needle, you can accidentally add extra wraps that look like mysterious holes or extra stitches.
- Use the needle tips, not the whole needle. Insert and pull loops using the tapered tips. This reduces strain and helps keep stitch size consistent.
- Watch stitch orientation (avoid twisting). If your stitches look like tight little crossed “V”s, you may be entering the stitch through the wrong leg. For most beginners, inserting the right needle left-to-right through the front leg of the stitch produces an untwisted stitch.
- Control tension with your fingers, not by yanking. After forming a new stitch, gently snug it to the needle. Over-tightening makes purling especially difficult on the next row.
- Pause to “read” every few stitches. In ribbing, check that knits look like “V”s and purls look like bumps on the side facing you. Catching one wrong stitch early is much easier than fixing it later.
“I kept mixing up which side was which, but the swatch method helped so much. After a few rows of stockinette and ribbing, I could finally see the V’s versus bumps, and fixing mistakes stopped feeling scary.”
If you enjoy mixing crafts, it can also help to take breaks with something low-pressure like free Christmas craft printables to rest your hands, then come back to knitting refreshed.
Creative Variations and Project Ideas
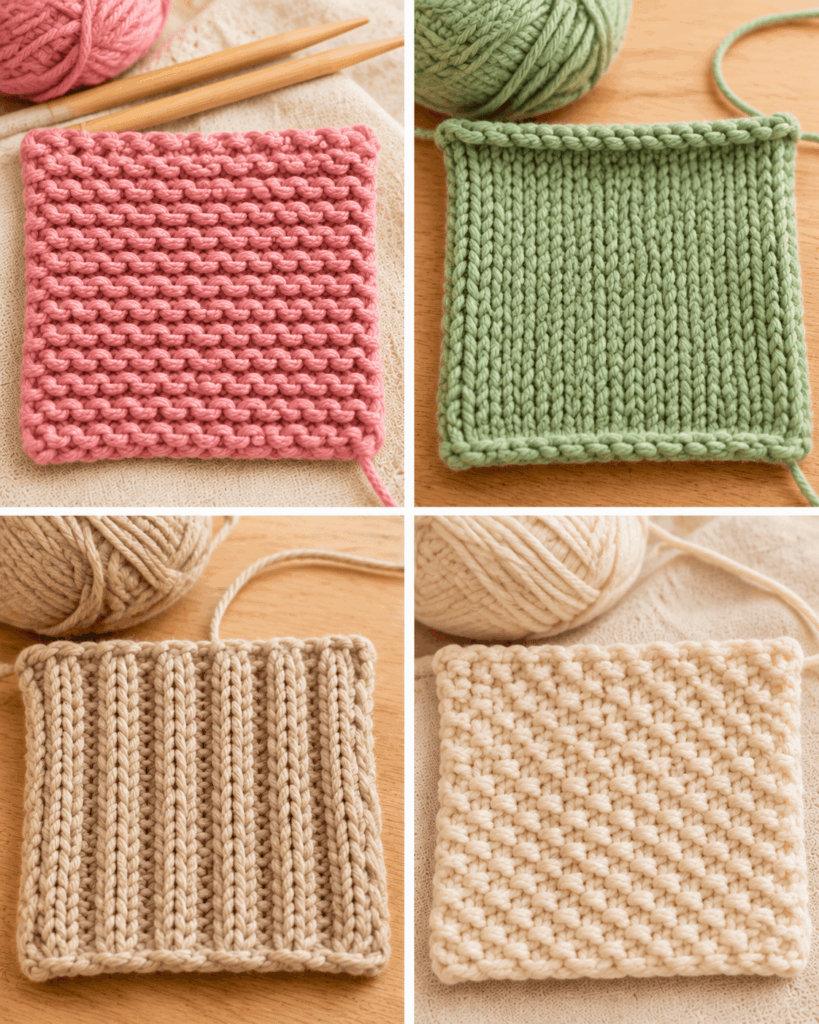
Once you understand knit stitch vs purl stitch, you can build a surprising number of beginner projects by combining them in simple patterns. The key idea is that knit and purl are like “pixels” of texture. Arrange them differently and you get totally different fabrics.
- Garter stitch scarf: Knit every row. This fabric lies flat, is stretchy, and forgiving. It is an ideal first scarf because it does not curl much.
- Stockinette cowl: Knit one round, purl one round if knitting flat. If knitting in the round, stockinette is just knitting every round. Add a ribbed edge (K1P1 or K2P2) to prevent rolling.
- Ribbed headband: Ribbing is springy and snug. A simple K2P2 rib makes a great headband or hat brim and teaches you to keep track of stitch patterns.
- Seed stitch washcloth: Alternate K1P1 across the row, then P1K1 on the next row. The texture is dense and lies flat, perfect for cotton dishcloths.
- Simple texture panels for home decor: Combine blocks of garter, stockinette, and ribbing into a pillow front.
Many crafters enjoy pairing handmade knits with practical sewn items. If you are building a handmade gift set, an easy apron sewing pattern can complement knitted dishcloths beautifully, and both are beginner-friendly skill builders.
Common Mistakes and How to Avoid Them
Most frustrations with knit stitch vs purl stitch come down to a few predictable issues. The good news is that they are fixable, and learning to diagnose them is a skill that will make you more independent quickly.
- Accidentally adding stitches: Often caused by wrapping yarn over the needle when moving between knit and purl, or by yarn overs you did not intend. Prevention: always move yarn front-to-back between needle tips, and count stitches every few rows.
- Dropping a stitch: You will see a “ladder” forming below where the stitch slipped off. Prevention: work over a table so dropped stitches do not fall far, and stop immediately when you notice a loose loop.
- Twisted stitches: Fabric looks tighter, less stretchy, and the Vs look crossed. Prevention: insert the needle through the correct leg consistently and wrap yarn the same direction each time.
- Uneven tension, especially in ribbing: Purls may look looser than knits (or vice versa). Prevention: gently snug after each stitch, and consider using a slightly smaller needle for ribbing edges once you are ready for that refinement.
- Stockinette curling: This is normal, not a failure. Stockinette naturally curls toward the knit side on side edges and toward the purl side at top and bottom. Prevention: add a border in garter or ribbing, or block the finished piece.
Safety note: repetitive hand motions can cause strain. Take breaks every 20 to 30 minutes, stretch your fingers, and avoid gripping needles tightly. If you feel numbness or pain, stop and rest.
Frequently Asked Questions About Knit Stitch vs. Purl Stitch: Beginner Differences Explained
What is the difference between knit and purl stitches?
The difference in knit stitch vs purl stitch is the direction you enter the stitch and where the working yarn sits while you form the new loop. A knit stitch (typically yarn in back) creates a smooth “V” on the side facing you. A purl stitch (typically yarn in front) creates a horizontal bump on the side facing you. They are essentially opposite sides of the same structure.
How can you tell a knit stitch from a purl stitch?
Look at the stitch on the needle and the fabric below it. A knit stitch shows a neat “V” column on the fabric side you are looking at. A purl stitch shows a little bump or bar. If you are working ribbing, “knit the Vs and purl the bumps” is the easiest rule. Turning your work over swaps what you see, which is why learning to read both sides helps.
Which stitch should beginners learn first?
Most beginners learn the knit stitch first because it is often easier to tension and the motion feels more natural. However, learning purl soon after is important because it unlocks stockinette and ribbing. A good plan is: knit-only garter swatch for a few rows, then purl-only practice for a couple rows, then combine them. That sequence reduces overwhelm and builds confidence.
What happens when you alternate knit and purl?
Alternating knit and purl creates textured patterns depending on how you alternate. If you alternate by rows (one row knit, one row purl), you get stockinette stitch when knitting flat. If you alternate within the same row (like K1P1), you create ribbing, which is stretchy and pulls in. If you offset the alternation between rows (seed stitch), you get a nubby texture that lies flatter.
What is stockinette stitch?
Stockinette stitch is the classic smooth fabric made by knitting one row and purling the next when working flat. One side looks like stacked “V”s (the knit side) and the other side looks bumpy (the purl side). If you knit in the round, stockinette is made by knitting every round. Stockinette drapes nicely but tends to curl at the edges unless you add a border.
How do you fix a mistaken knit or purl stitch?
If you spot the mistake in the row you are currently working, the simplest fix is to “tink” back: un-knit or un-purl one stitch at a time by reversing the motion until you reach the error, then rework correctly. If the mistake is a few rows down, you can drop the column (ladder down) to the mistake and use a crochet hook to rebuild the stitches correctly, switching knit/purl as needed. Go slowly and check each rung.
Final Thoughts
Understanding knit stitch vs purl stitch is your gateway to real knitting freedom. With just these two stitches, you can create flat garter fabric, smooth stockinette, springy ribbing, and textured patterns that look far beyond beginner level. Start with a labeled swatch, practice moving the yarn between the needles cleanly, and learn to read Vs and bumps so mistakes are easy to catch and fix. If you want extra visual backup as you practice, the diagram guide Knit vs Purl – the difference between these basic stitches [+diagram] is a great reference. Your next step: cast on 20 stitches today and make that first “texture sampler” square, then choose one small project idea and repeat the pattern until it feels natural.